24415 I.Montaje Nexus - GALA · Colocar los soportes de apoyo (no suministrados) distribuyéndolos...
12
Español Bañera acrílica Instrucciones de montaje English Acrylic bathtub Installation instructions NEXUS
Transcript of 24415 I.Montaje Nexus - GALA · Colocar los soportes de apoyo (no suministrados) distribuyéndolos...
Español Bañera acrílicaInstrucciones de montaje
English Acrylic bathtubInstallation instructions
NEXUS
2
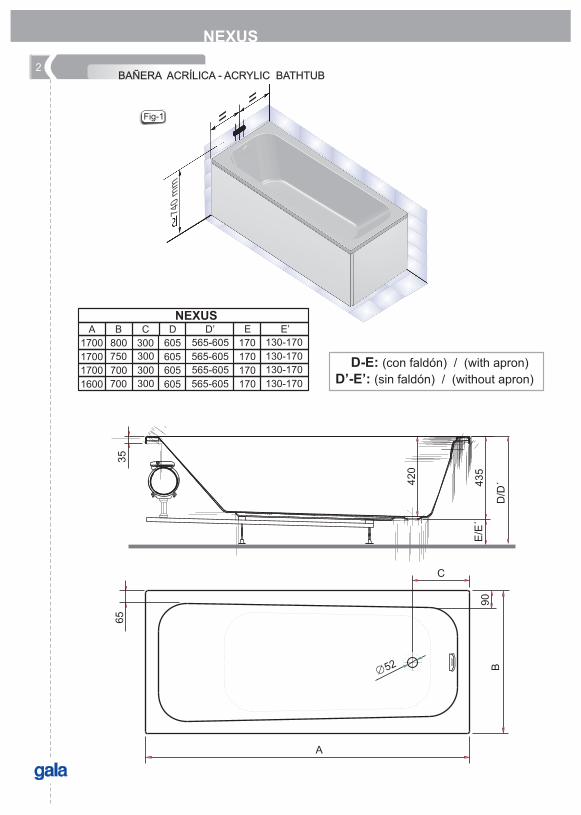
D-E: (con faldón) / (with apron)
D’-E’: (sin faldón) / (without apron)
NEXUS
1700
1600
300
300
605
605
565-605
565-605
A D’B C D
170
170 130-170
130-170
E E’
700
700
BAÑERA ACRÍLICA - ACRYLIC BATHTUB
NEXUS
Fig-1
1700
1700
300
300
605
605
565-605
565-605
170
170 130-170
130-170800
750
420
C
35
435
E/E
´
D/D
´
65
90
Ø 52
A
B
3
1
2
3
NEXUS
x4
a
1700x750/700/8001600x700 100
185
Inox 5x20 DIN 7505-A
Inox M8 DIN 9021
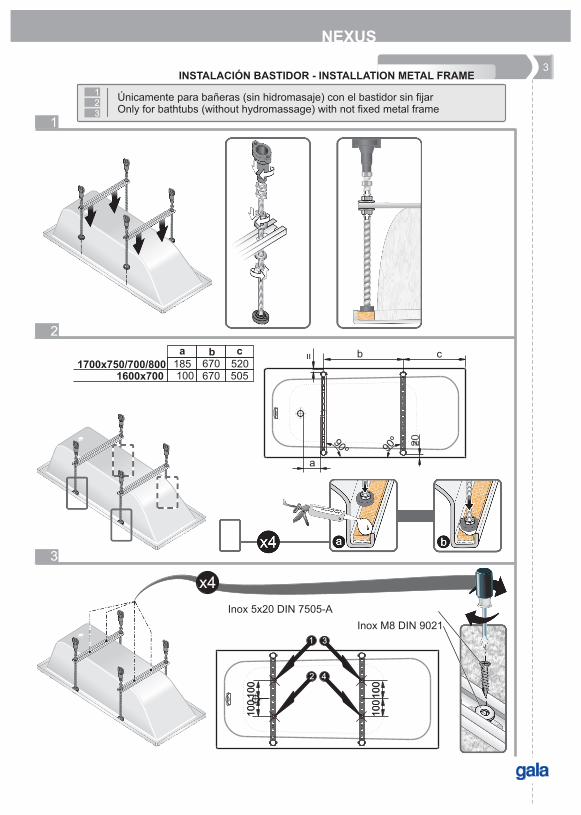
INSTALACIÓN BASTIDOR - INSTALLATION METAL FRAME
Únicamente para bañeras (sin hidromasaje) con el bastidor sin fijar Only for bathtubs (without hydromassage) with not fixed metal frame
123
b c=
a
90º 90º 20
=
10
01
00
10
01
00
42
1 3
100
10
01
00
10
0
b
670670
c
505520
2
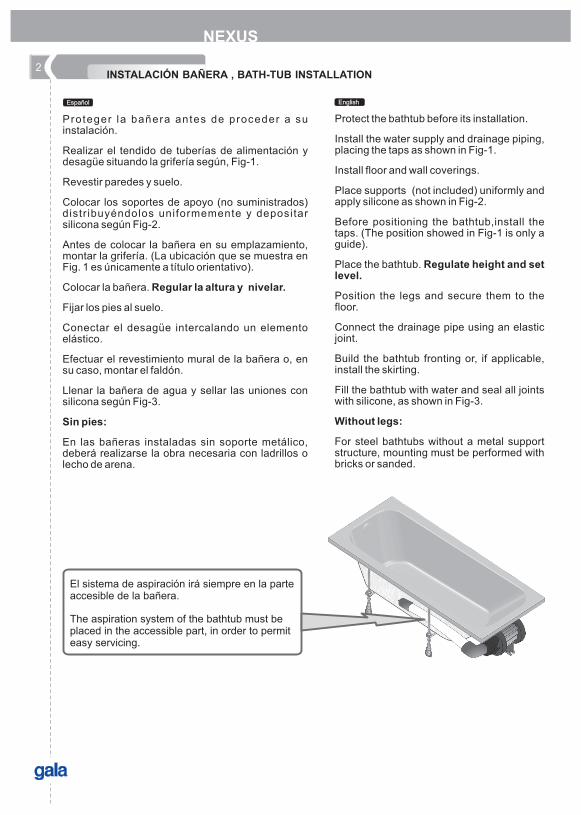
Proteger la bañera antes de proceder a su instalación.
Realizar el tendido de tuberías de alimentación y desagüe situando la grifería según, Fig-1.
Revestir paredes y suelo.
Colocar los soportes de apoyo (no suministrados) distr ibuyéndolos uniformemente y depositar silicona según Fig-2.
Antes de colocar la bañera en su emplazamiento, montar la grifería. (La ubicación que se muestra en Fig. 1 es únicamente a título orientativo).
Colocar la bañera. Regular la altura y nivelar.
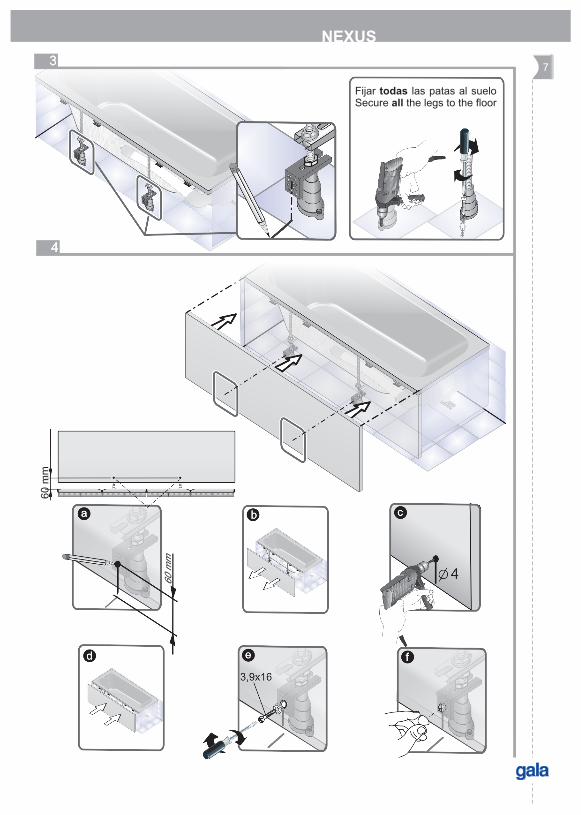
Fijar los pies al suelo.
Conectar el desagüe intercalando un elemento elástico.
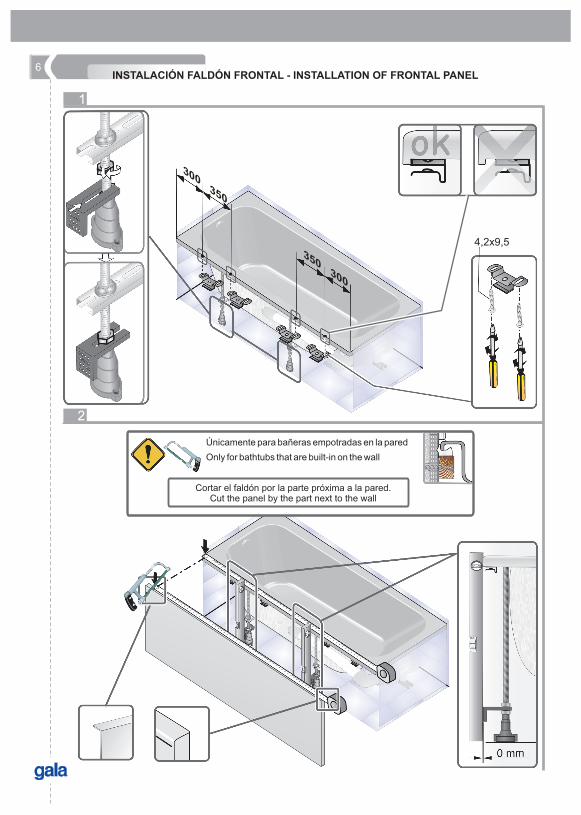
Efectuar el revestimiento mural de la bañera o, en su caso, montar el faldón.
Llenar la bañera de agua y sellar las uniones con silicona según Fig-3.
Sin pies:
En las bañeras instaladas sin soporte metálico, deberá realizarse la obra necesaria con ladrillos o lecho de arena.
Protect the bathtub before its installation.
Install the water supply and drainage piping, placing the taps as shown in Fig-1.
Install floor and wall coverings.
Place supports (not included) uniformly and apply silicone as shown in Fig-2.
Before positioning the bathtub,install the taps. (The position showed in Fig-1 is only a guide).
Place the bathtub. Regulate height and set level.
Position the legs and secure them to the floor.
Connect the drainage pipe using an elastic joint.
Build the bathtub fronting or, if applicable, install the skirting.
Fill the bathtub with water and seal all joints with silicone, as shown in Fig-3.
Without legs:
For steel bathtubs without a metal support structure, mounting must be performed with bricks or sanded.
INSTALACIÓN BAÑERA , BATH-TUB INSTALLATION
Español English
NEXUS
El sistema de aspiración irá siempre en la parte accesible de la bañera.
The aspiration system of the bathtub must be placed in the accessible part, in order to permit easy servicing.
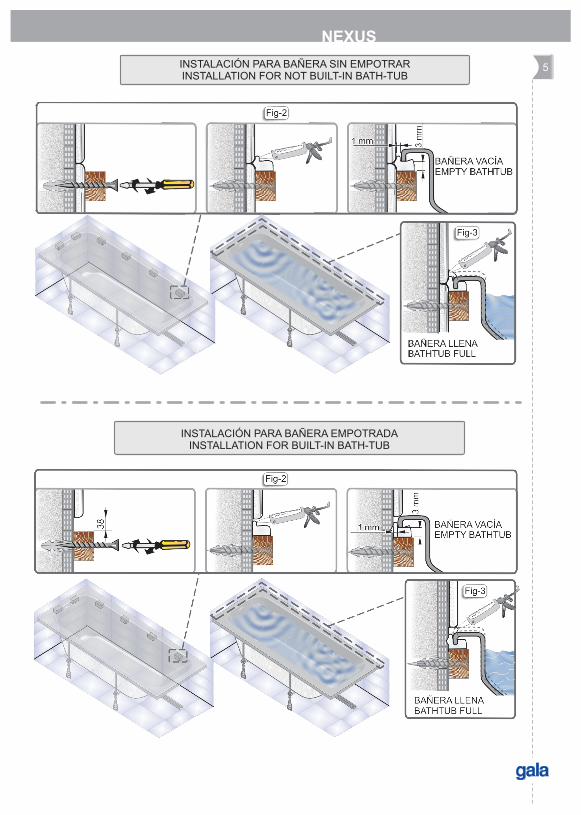
5INSTALACIÓN PARA BAÑERA SIN EMPOTRARINSTALLATION FOR NOT BUILT-IN BATH-TUB
INSTALACIÓN PARA BAÑERA EMPOTRADAINSTALLATION FOR BUILT-IN BATH-TUB
NEXUS
350
300
300
350
6
1
2
INSTALACIÓN FALDÓN FRONTAL - INSTALLATION OF FRONTAL PANEL
Únicamente para bañeras empotradas en la pared
Only for bathtubs that are built-in on the wall
Cortar el faldón por la parte próxima a la pared.Cut the panel by the part next to the wall
4,2x9,5
60 m
m
Fijar todas las patas al sueloSecure all the legs to the floor
7
NEXUS
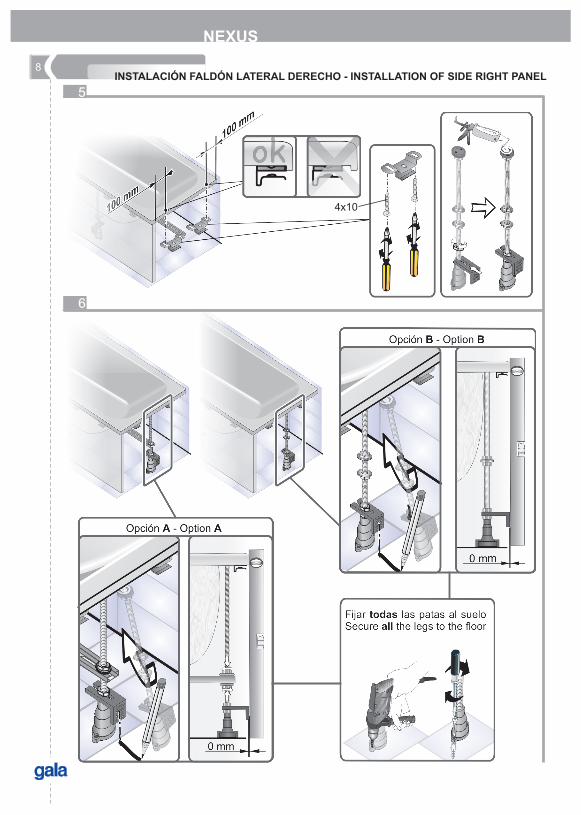
6
4x10
5
8INSTALACIÓN FALDÓN LATERAL DERECHO - INSTALLATION OF SIDE RIGHT PANEL
NEXUS
97
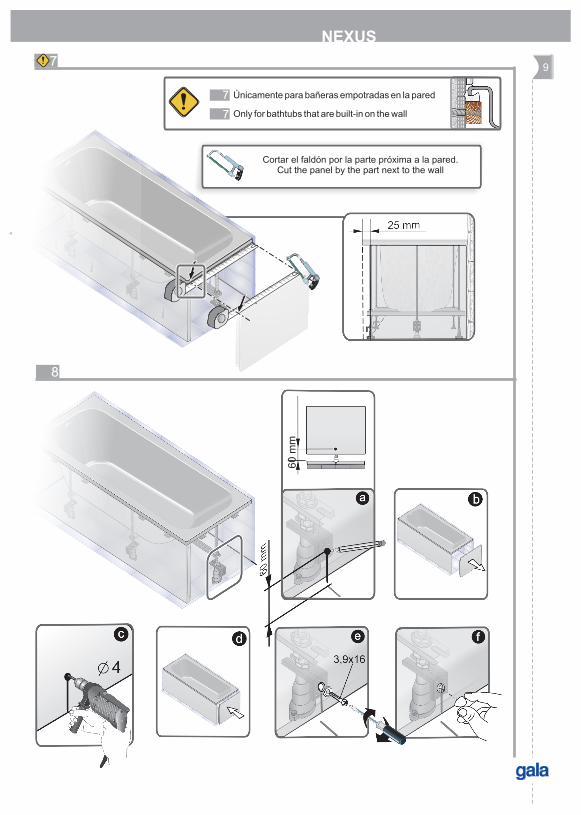
Únicamente para bañeras empotradas en la pared7
Only for bathtubs that are built-in on the wall7
Cortar el faldón por la parte próxima a la pared.Cut the panel by the part next to the wall
NEXUS
60 m
m
8
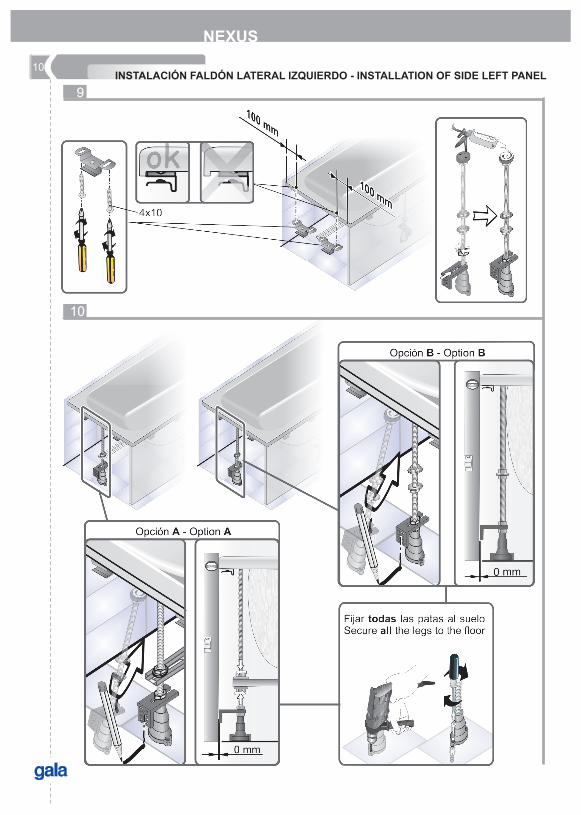
10
9
10
INSTALACIÓN FALDÓN LATERAL IZQUIERDO - INSTALLATION OF SIDE LEFT PANEL
NEXUS
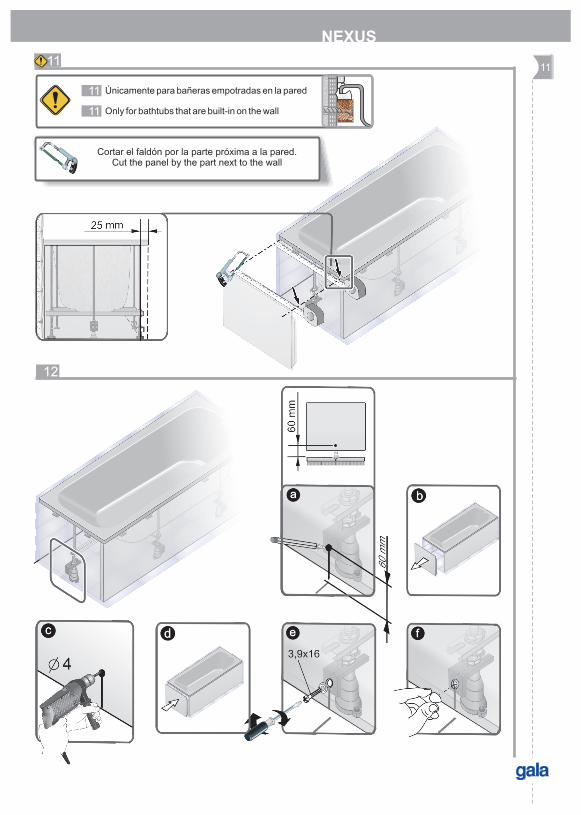
11
12
Únicamente para bañeras empotradas en la pared11
11 Only for bathtubs that are built-in on the wall
Cortar el faldón por la parte próxima a la pared.Cut the panel by the part next to the wall
11
NEXUS

CERÁMICAS GALA, S.A.Ctra. Madrid - Irún, Km. 244Apartado de Correos, 293
09080 BURGOS - ESPAÑAwww.gala.es
+34-947 47 41 00+34-947 47 41 03
e-mail: [email protected]
Las medidas e información son a título orientativo y susceptibles de modificación sin previo aviso. Este documento anula los anteriores.All information and dimensions should be considered merely approximate and are subject to modification without notice. This document cancels the former ones.
24
41
5 -
06
/08
/10