Equipo7 Arduino
23
Colegio De Estudios Científicos & Tecnológicos Del Estado De México CECYTEM Tecámac Proyectos Arduino Administra Sistemas Operativos & Instala & Configura Aplicaciones & Servicios Profesor: Rene Domínguez Escalona Integrantes: Joel Rebollo Lázaro Oscar Olvera Leiva Alma Brenda Ramos Cabrera Uriel Álvarez Jiménez
-
Upload
joel-rebollo -
Category
Technology
-
view
104 -
download
3
Transcript of Equipo7 Arduino

Colegio De Estudios Científicos & Tecnológicos Del Estado De México
CECYTEM
Tecámac
Proyectos Arduino
Administra Sistemas Operativos
&
Instala & Configura Aplicaciones & Servicios
Profesor: Rene Domínguez Escalona
Integrantes:
Joel Rebollo Lázaro
Oscar Olvera Leiva
Alma Brenda Ramos Cabrera
Uriel Álvarez Jiménez
Sergio Florencio Domínguez
David Hernández Cruz
Introducción
En este proyecto que llevaremos a cabo a continuación te mostrara dos proyectos el primero es contador este consiste en dos pulsadores, cuando se oprime uno el código tiene la orden de hacer descender o ascender el numero en pulsación larga o en pitidos. Veremos paso a paso su desarrollo de cómo fue construido lista de materiales & como se lleva a cabo todo el proyecto.
Este curso pretende dar a conocer los mecanismos de programación de la placa Arduino, sus principales características y usos y aplicaciones.
Objetivo
El objetivo de estos dos proyectos es conocer a fondo el funcionamiento de arduino & en que consta.
Tras finalizar el curso, los alumnos -aún sin tener conocimientos previos ni de electrónica ni de programación- contarán con las habilidades, recursos y conocimientos necesarios para poder planificar, diseñar, prototipar y construir por su propia cuenta circuitos con Arduino de una complejidad moderada
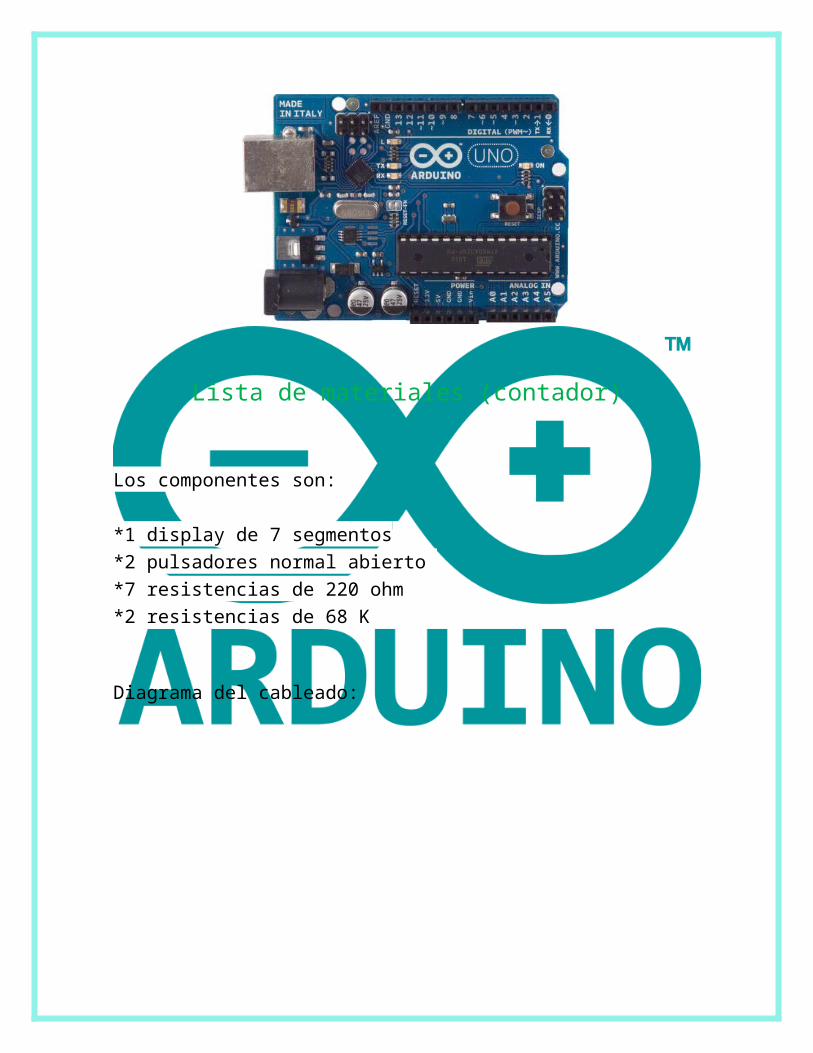
Lista de materiales (contador)
Los componentes son:
*1 display de 7 segmentos *2 pulsadores normal abierto *7 resistencias de 220 ohm *2 resistencias de 68 K
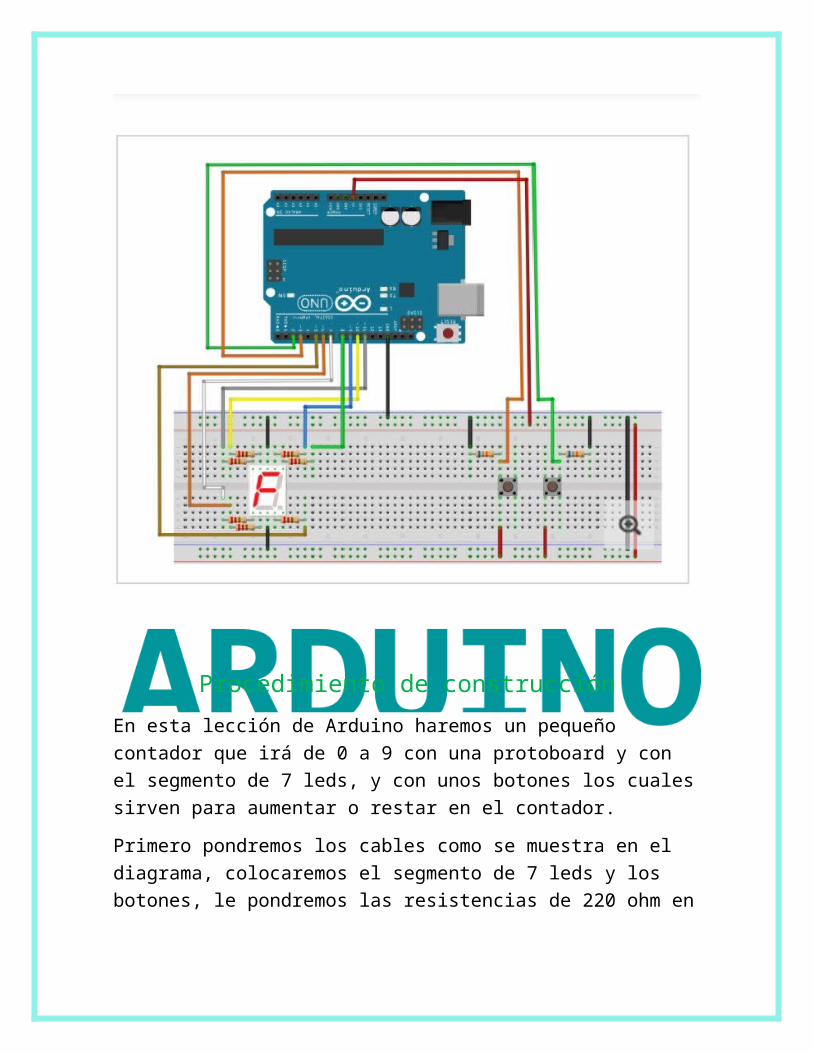
Diagrama del cableado:
Procedimiento de construcción
En esta lección de Arduino haremos un pequeño contador que irá de 0 a 9 con una protoboard y con el segmento de 7 leds, y con unos botones los cuales sirven para aumentar o restar en el contador.
Primero pondremos los cables como se muestra en el diagrama, colocaremos el segmento de 7 leds y los botones, le pondremos las resistencias de 220 ohm en donde se tienen poner, después cargaremos el código para poder ver si funciona bien el contador.
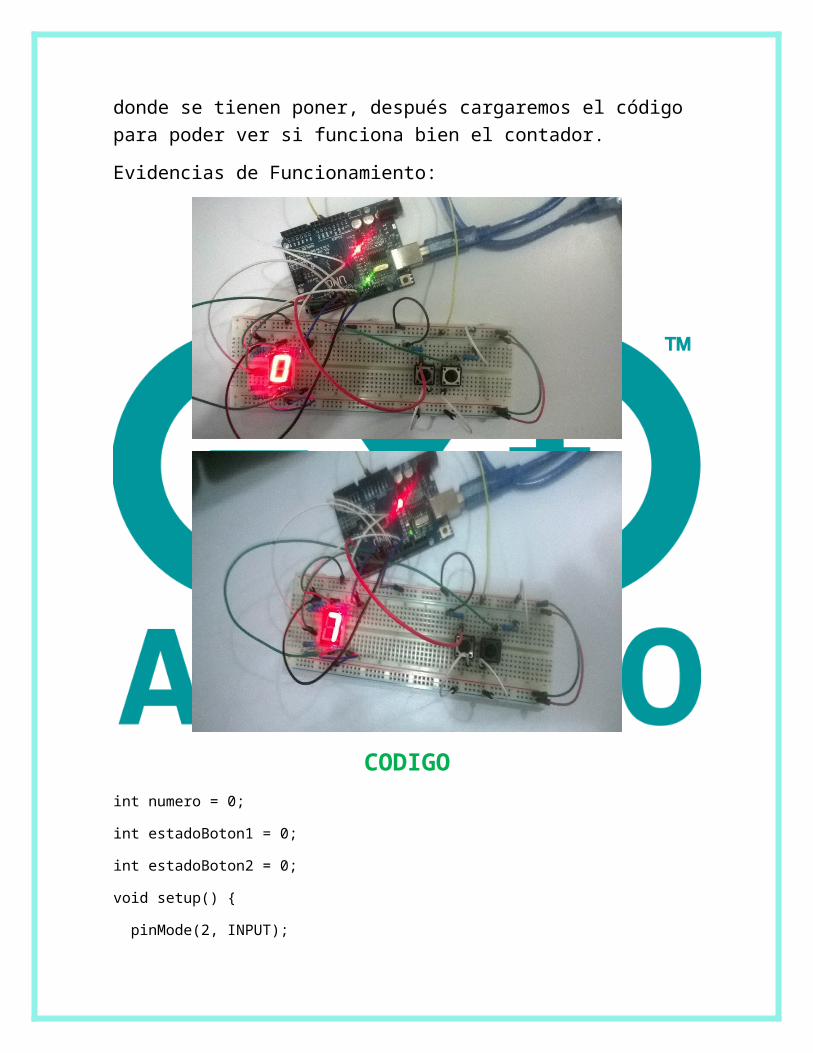
Evidencias de Funcionamiento:
CODIGOint numero = 0;
int estadoBoton1 = 0;
int estadoBoton2 = 0;
void setup() {
pinMode(2, INPUT);
pinMode(3, INPUT);
pinMode(4, OUTPUT);
pinMode(5, OUTPUT);
pinMode(6, OUTPUT);
pinMode(7, OUTPUT);
pinMode(8, OUTPUT);
pinMode(9, OUTPUT);
pinMode(10, OUTPUT);
pinMode(11, OUTPUT);
}
void loop() {
estadoBoton1 = digitalRead(2);
estadoBoton2 = digitalRead(3);
if (estadoBoton1 == LOW and numero < 9) {
Numero = numero + 1;
}
if (estadoBoton2 == LOW and numero > 0) {
Numero = numero - 1;
}
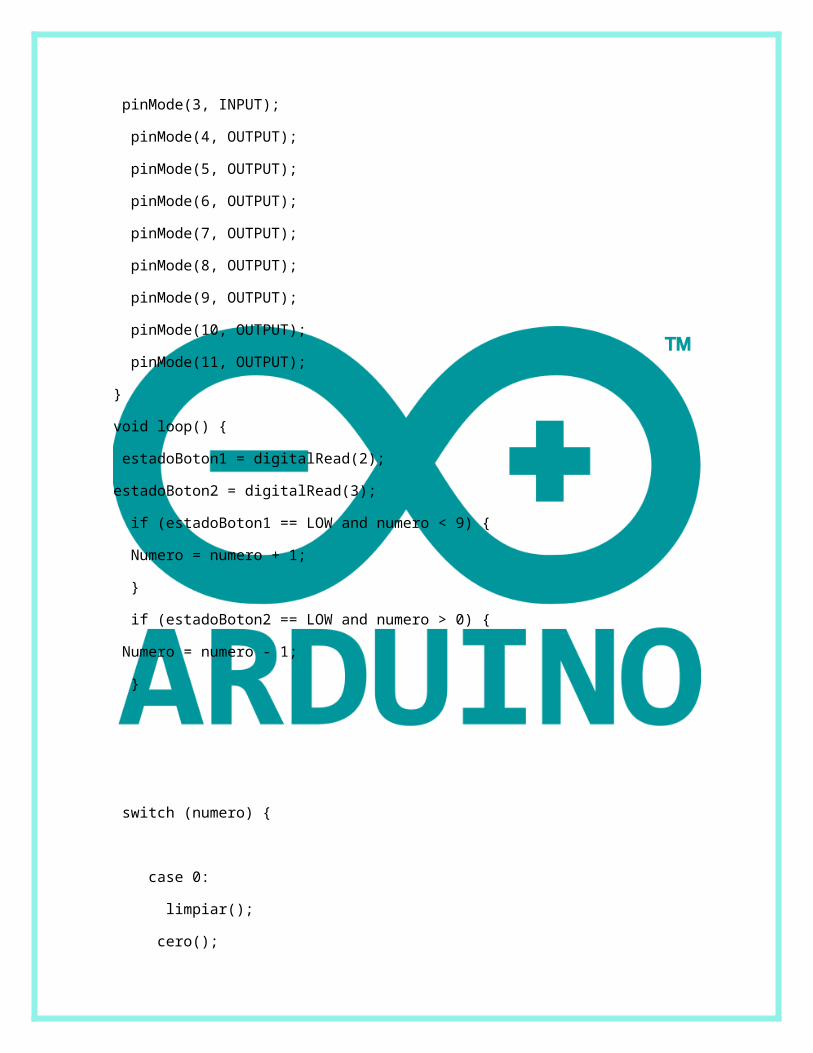
switch (numero) {
case 0:
limpiar();
cero();
break;
case 1:
limpiar();
uno();
break;
case 2:
limpiar();
dos();
break;
case 3:
limpiar();
tres();
break;
case 4:
limpiar();
cuatro();
break;
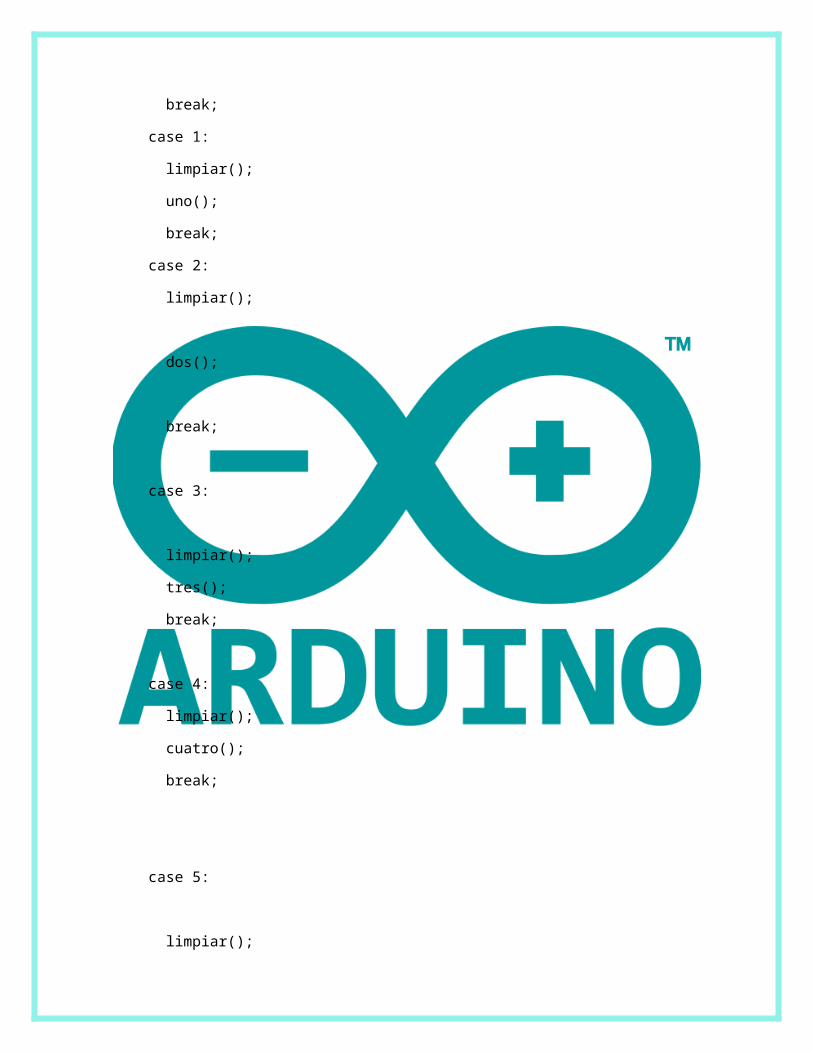
case 5:
limpiar();
cinco();
break;
case 6:
limpiar();
seis();
break;
case 7:
limpiar();
siete();
break;
case 8:
limpiar();
ocho();
break;
case 9:
limpiar();
nueve();
break;
}
delay(125);
}

void cero(){
digitalWrite(10,HIGH);
digitalWrite(5,HIGH);
digitalWrite(6,HIGH);
digitalWrite(7,HIGH);
digitalWrite(8,HIGH);
digitalWrite(9,HIGH);
}
void uno(){
digitalWrite(8,HIGH);
digitalWrite(5,HIGH);
}
void dos(){
digitalWrite(9,HIGH);
digitalWrite(8,HIGH);
digitalWrite(6,HIGH);
digitalWrite(7,HIGH);
digitalWrite(11,HIGH);
}
void tres(){
digitalWrite(6,HIGH);
digitalWrite(5,HIGH);
digitalWrite(11,HIGH);
digitalWrite(8,HIGH);
digitalWrite(9,HIGH);
}
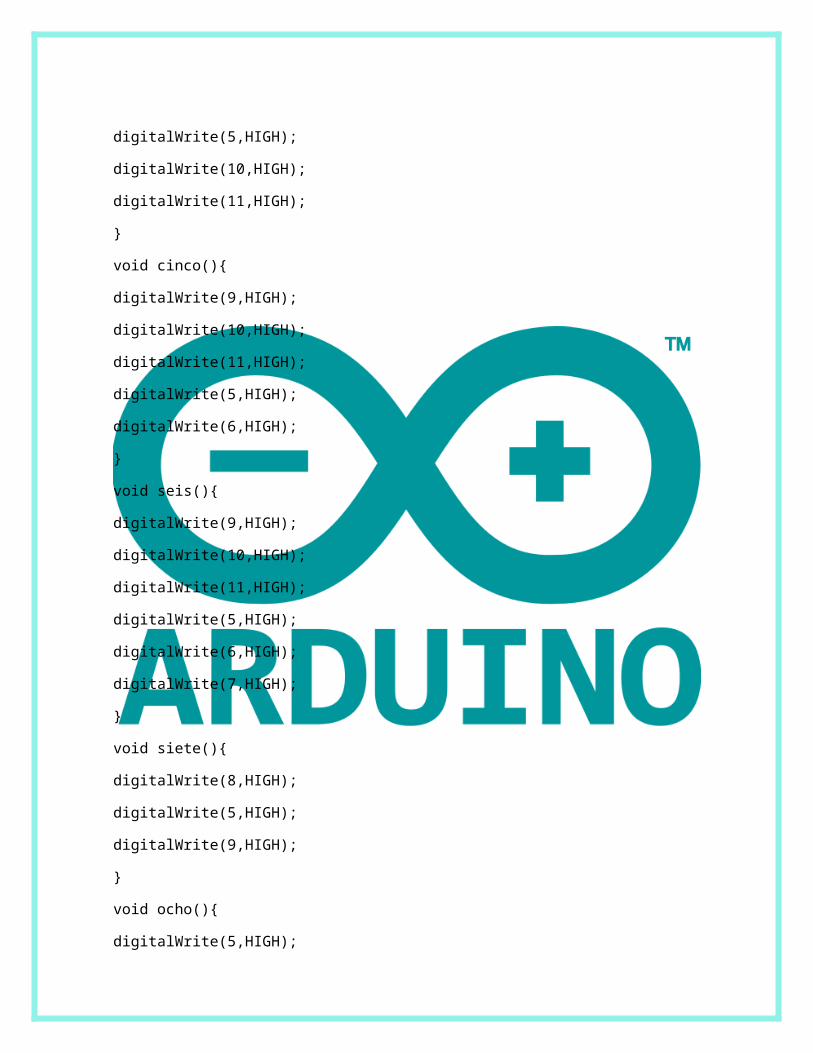
void cuatro(){
digitalWrite(8,HIGH);
digitalWrite(5,HIGH);
digitalWrite(10,HIGH);
digitalWrite(11,HIGH);
}
void cinco(){
digitalWrite(9,HIGH);
digitalWrite(10,HIGH);
digitalWrite(11,HIGH);
digitalWrite(5,HIGH);
digitalWrite(6,HIGH);
}
void seis(){
digitalWrite(9,HIGH);
digitalWrite(10,HIGH);
digitalWrite(11,HIGH);
digitalWrite(5,HIGH);
digitalWrite(6,HIGH);
digitalWrite(7,HIGH);
}
void siete(){
digitalWrite(8,HIGH);
digitalWrite(5,HIGH);
digitalWrite(9,HIGH);
}
void ocho(){
digitalWrite(5,HIGH);
digitalWrite(6,HIGH);
digitalWrite(7,HIGH);
digitalWrite(8,HIGH);
digitalWrite(9,HIGH);
digitalWrite(10,HIGH);
digitalWrite(11,HIGH);
}
void nueve(){
digitalWrite(5,HIGH);
digitalWrite(8,HIGH);
digitalWrite(9,HIGH);
digitalWrite(10,HIGH);
digitalWrite(11,HIGH);
}
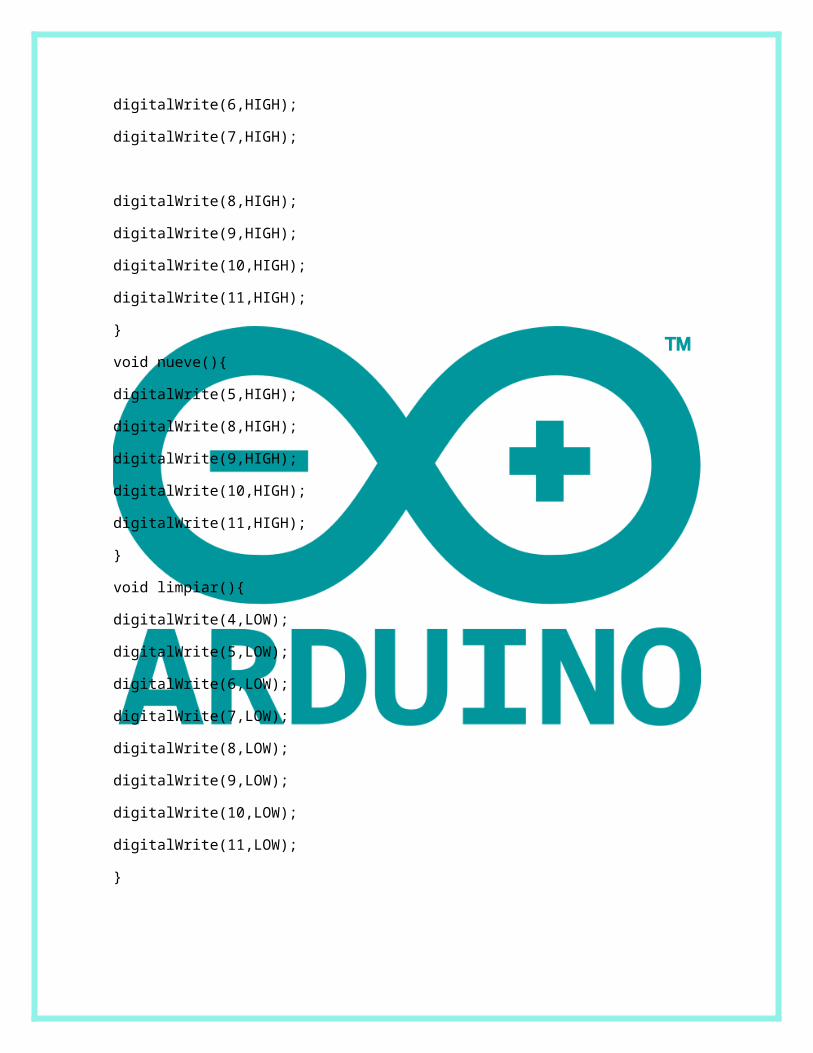
void limpiar(){
digitalWrite(4,LOW);
digitalWrite(5,LOW);
digitalWrite(6,LOW);
digitalWrite(7,LOW);
digitalWrite(8,LOW);
digitalWrite(9,LOW);
digitalWrite(10,LOW);
digitalWrite(11,LOW);
}
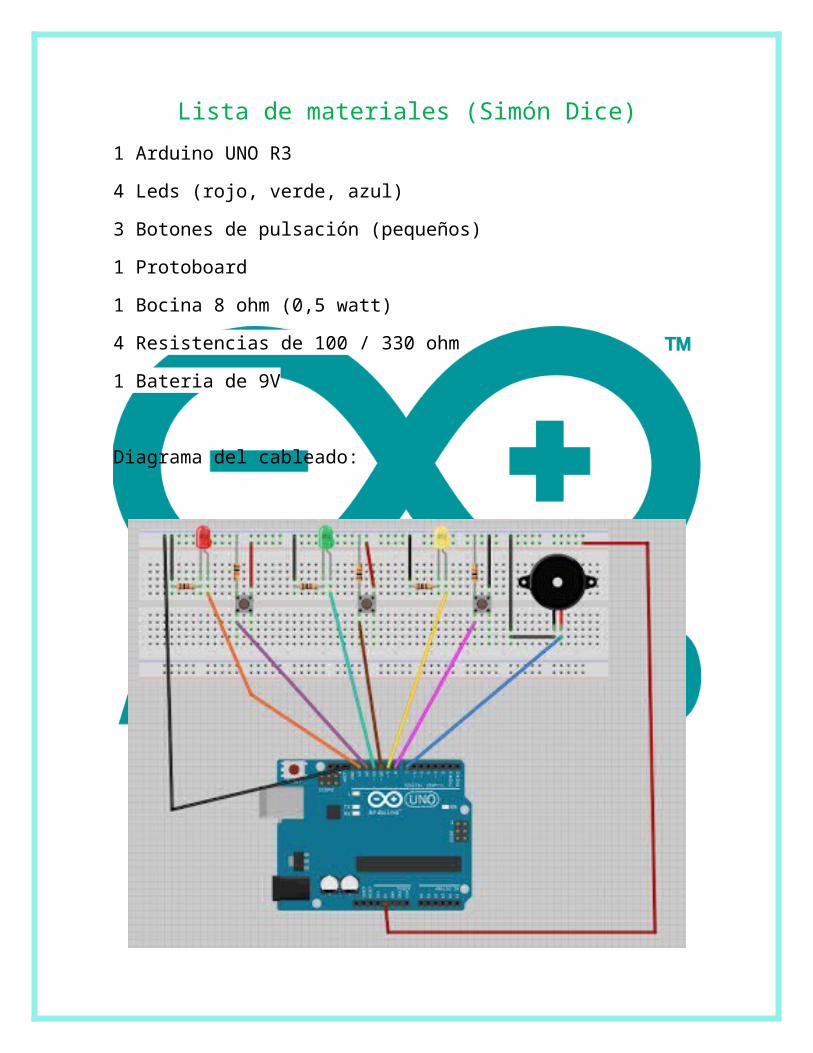
Lista de materiales (Simón Dice)
1 Arduino UNO R3
4 Leds (rojo, verde, azul)
3 Botones de pulsación (pequeños)
1 Protoboard
1 Bocina 8 ohm (0,5 watt)
4 Resistencias de 100 / 330 ohm
1 Bateria de 9V
Diagrama del cableado:
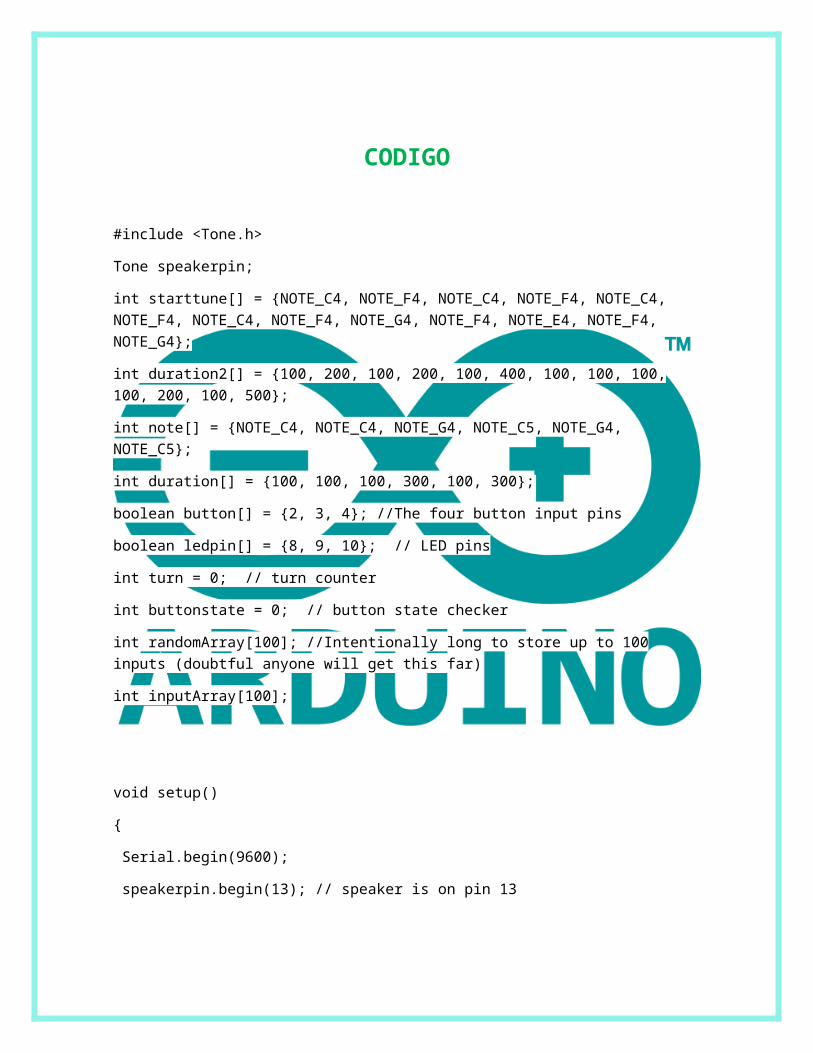
CODIGO
#include <Tone.h>
Tone speakerpin;
int starttune[] = {NOTE_C4, NOTE_F4, NOTE_C4, NOTE_F4, NOTE_C4, NOTE_F4, NOTE_C4, NOTE_F4, NOTE_G4, NOTE_F4, NOTE_E4, NOTE_F4, NOTE_G4};
int duration2[] = {100, 200, 100, 200, 100, 400, 100, 100, 100, 100, 200, 100, 500};
int note[] = {NOTE_C4, NOTE_C4, NOTE_G4, NOTE_C5, NOTE_G4, NOTE_C5};
int duration[] = {100, 100, 100, 300, 100, 300};
boolean button[] = {2, 3, 4}; //The four button input pins
boolean ledpin[] = {8, 9, 10}; // LED pins
int turn = 0; // turn counter
int buttonstate = 0; // button state checker
int randomArray[100]; //Intentionally long to store up to 100 inputs (doubtful anyone will get this far)
int inputArray[100];
void setup()
{
Serial.begin(9600);
speakerpin.begin(13); // speaker is on pin 13
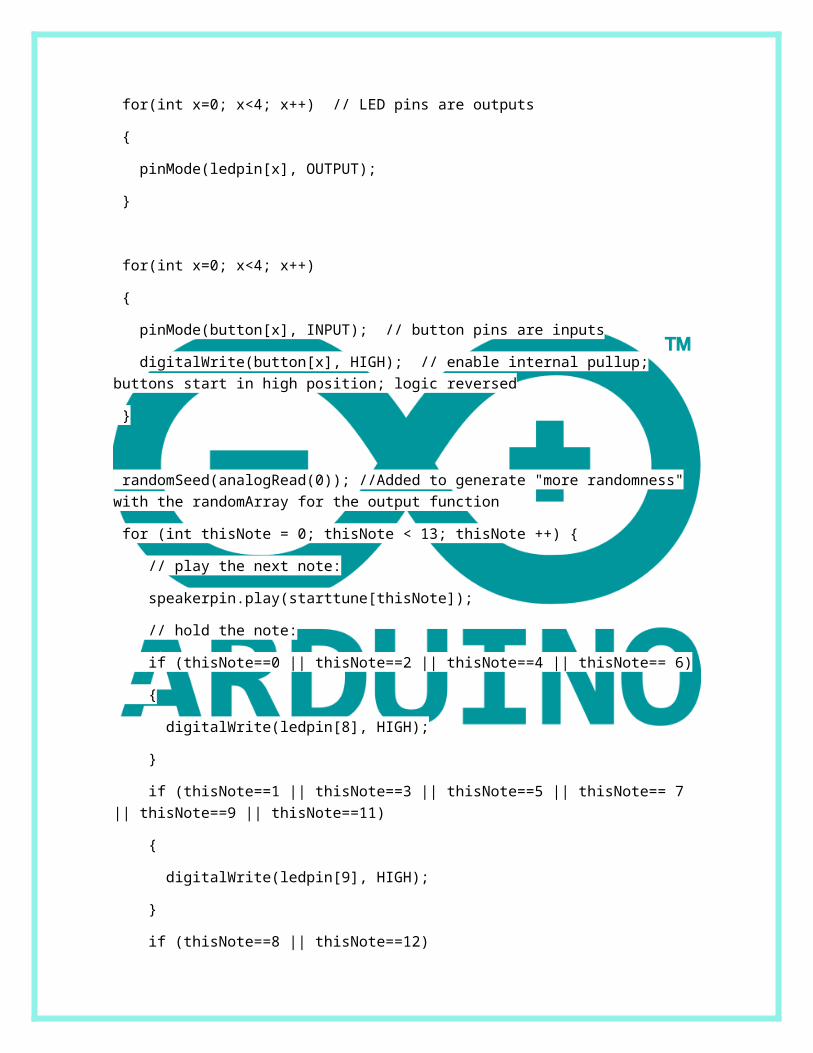
for(int x=0; x<4; x++) // LED pins are outputs
{
pinMode(ledpin[x], OUTPUT);
}
for(int x=0; x<4; x++)
{
pinMode(button[x], INPUT); // button pins are inputs
digitalWrite(button[x], HIGH); // enable internal pullup; buttons start in high position; logic reversed
}
randomSeed(analogRead(0)); //Added to generate "more randomness" with the randomArray for the output function
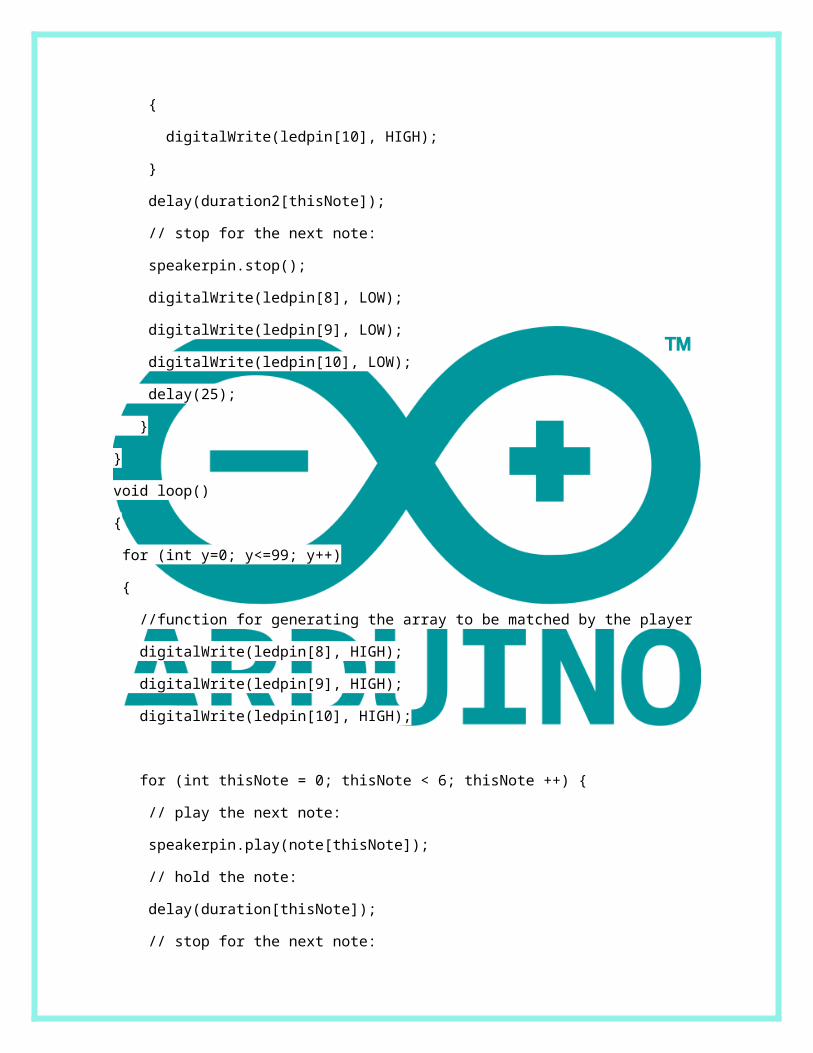
for (int thisNote = 0; thisNote < 13; thisNote ++) {
// play the next note:
speakerpin.play(starttune[thisNote]);
// hold the note:
if (thisNote==0 || thisNote==2 || thisNote==4 || thisNote== 6)
{
digitalWrite(ledpin[8], HIGH);
}
if (thisNote==1 || thisNote==3 || thisNote==5 || thisNote== 7 || thisNote==9 || thisNote==11)
{
digitalWrite(ledpin[9], HIGH);
}
if (thisNote==8 || thisNote==12)
{
digitalWrite(ledpin[10], HIGH);
}
delay(duration2[thisNote]);
// stop for the next note:
speakerpin.stop();
digitalWrite(ledpin[8], LOW);
digitalWrite(ledpin[9], LOW);
digitalWrite(ledpin[10], LOW);
delay(25);
}
}
void loop()
{
for (int y=0; y<=99; y++)
{
//function for generating the array to be matched by the player
digitalWrite(ledpin[8], HIGH);
digitalWrite(ledpin[9], HIGH);
digitalWrite(ledpin[10], HIGH);
for (int thisNote = 0; thisNote < 6; thisNote ++) {
// play the next note:
speakerpin.play(note[thisNote]);
// hold the note:
delay(duration[thisNote]);
// stop for the next note:
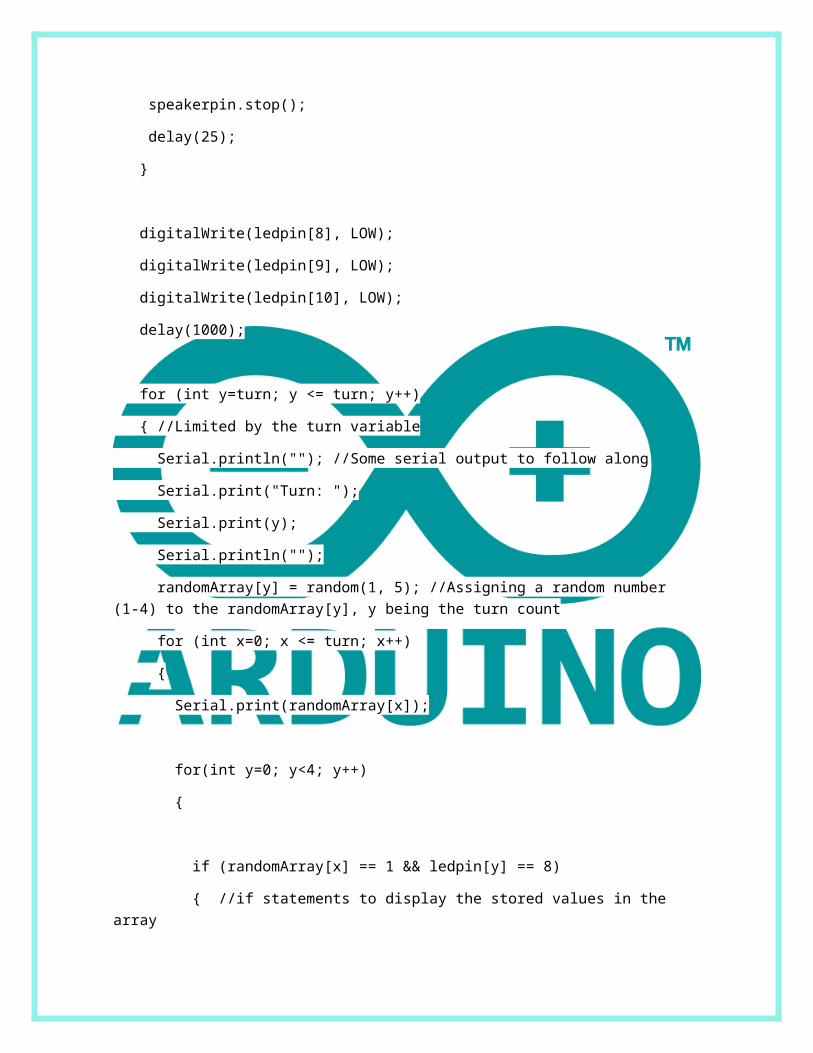
speakerpin.stop();
delay(25);
}
digitalWrite(ledpin[8], LOW);
digitalWrite(ledpin[9], LOW);
digitalWrite(ledpin[10], LOW);
delay(1000);
for (int y=turn; y <= turn; y++)
{ //Limited by the turn variable
Serial.println(""); //Some serial output to follow along
Serial.print("Turn: ");
Serial.print(y);
Serial.println("");
randomArray[y] = random(1, 5); //Assigning a random number (1-4) to the randomArray[y], y being the turn count
for (int x=0; x <= turn; x++)
{
Serial.print(randomArray[x]);
for(int y=0; y<4; y++)
{
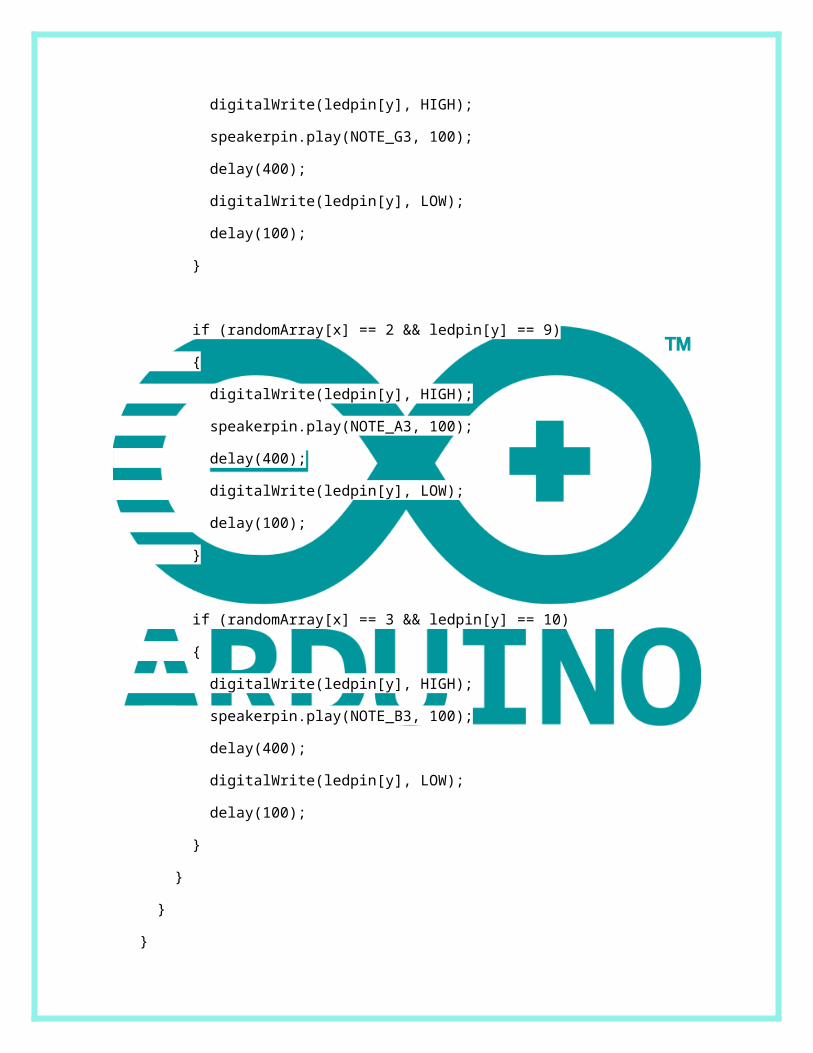
if (randomArray[x] == 1 && ledpin[y] == 8)
{ //if statements to display the stored values in the array
digitalWrite(ledpin[y], HIGH);
speakerpin.play(NOTE_G3, 100);
delay(400);
digitalWrite(ledpin[y], LOW);
delay(100);
}
if (randomArray[x] == 2 && ledpin[y] == 9)
{
digitalWrite(ledpin[y], HIGH);
speakerpin.play(NOTE_A3, 100);
delay(400);
digitalWrite(ledpin[y], LOW);
delay(100);
}
if (randomArray[x] == 3 && ledpin[y] == 10)
{
digitalWrite(ledpin[y], HIGH);
speakerpin.play(NOTE_B3, 100);
delay(400);
digitalWrite(ledpin[y], LOW);
delay(100);
}
}
}
}
input();
}
}
void input() { //Function for allowing user input and checking input against the generated array
for (int x=0; x <= turn;)
{ //Statement controlled by turn count
for(int y=0; y<4; y++)
{
buttonstate = digitalRead(button[y]);
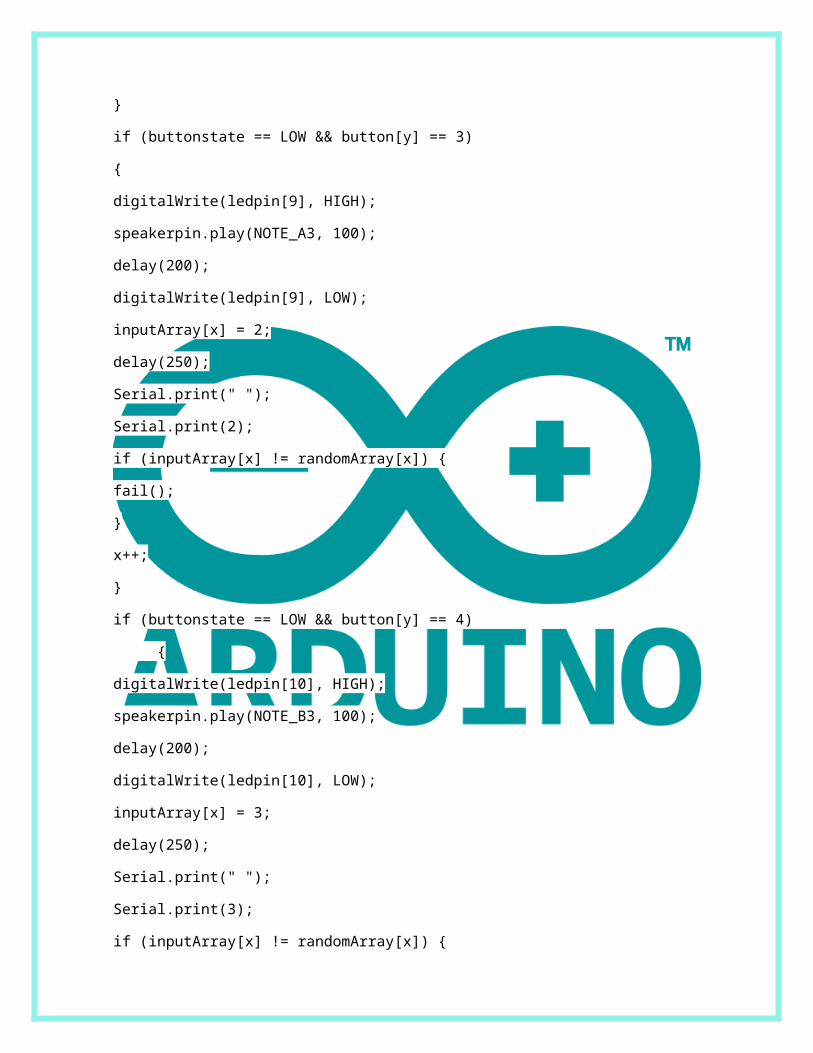
if (buttonstate == LOW && button[y] == 2)
{ //Checking for button push
digitalWrite(ledpin[8], HIGH);
speakerpin.play(NOTE_G3, 100);
delay(200);
digitalWrite(ledpin[8], LOW);
inputArray[x] = 1;
delay(250);
Serial.print(" ");
Serial.print(1);
if (inputArray[x] != randomArray[x]) { //Checks value input by user and checks it against
fail(); //the value in the same spot on the generated array
} //The fail function is called if it does not match
x++;
}
if (buttonstate == LOW && button[y] == 3)
{
digitalWrite(ledpin[9], HIGH);
speakerpin.play(NOTE_A3, 100);
delay(200);
digitalWrite(ledpin[9], LOW);
inputArray[x] = 2;
delay(250);
Serial.print(" ");
Serial.print(2);
if (inputArray[x] != randomArray[x]) {
fail();
}
x++;
}
if (buttonstate == LOW && button[y] == 4)
{
digitalWrite(ledpin[10], HIGH);
speakerpin.play(NOTE_B3, 100);
delay(200);

digitalWrite(ledpin[10], LOW);
inputArray[x] = 3;
delay(250);
Serial.print(" ");
Serial.print(3);
if (inputArray[x] != randomArray[x]) {
fail();
}
x++;
}
}
}
delay(500);
turn++; //Increments the turn count, also the last action before starting the output function over again
}
void fail() { //Function used if the player fails to match the sequence
for (int y=0; y<=2; y++)
{ //Flashes lights for failure
digitalWrite(ledpin[8], HIGH);
digitalWrite(ledpin[9], HIGH);
digitalWrite(ledpin[10], HIGH);
speakerpin.play(NOTE_G3, 300);
delay(200);
digitalWrite(ledpin[8], LOW);
digitalWrite(ledpin[9], LOW);
digitalWrite(ledpin[10], LOW);
speakerpin.play(NOTE_C3, 300);
delay(200);
}
delay(500);
turn = -1; //Resets turn value so the game starts over without need for a reset button
}
Conclusiones del equipo
En este caso nosotros realizamos dos proyectos & veremos su funcionamiento que hace & como fue elaborado.
Al realizar las labores con arduino se nos complicaron un poco las cosas pero al final se pudo obtener un resultado muy satisfactorio para el equipo, ya que obtuvimos conocimientos que no son de la materia pero sin embargo son de mucha ayuda para la electrónica y nuestra vida a futuro por lo cual hicimos nuestro más grande esfuerzo y entregamos mucha dedicación al proyecto por lo cual…..es un resultado satisfactorio.
Al comentar con el equipo de trabajo que tal vieron el desempeño en arduino llegamos a la conclusión de que, arduino es un sistema de programación de última generación que tuvimos el privilegio de usarlo, y valla que muy pocos tienen ese privilegio por lo cual intentamos explotarlo al máximo aunque fuese difícil.