
pollerita niña
3
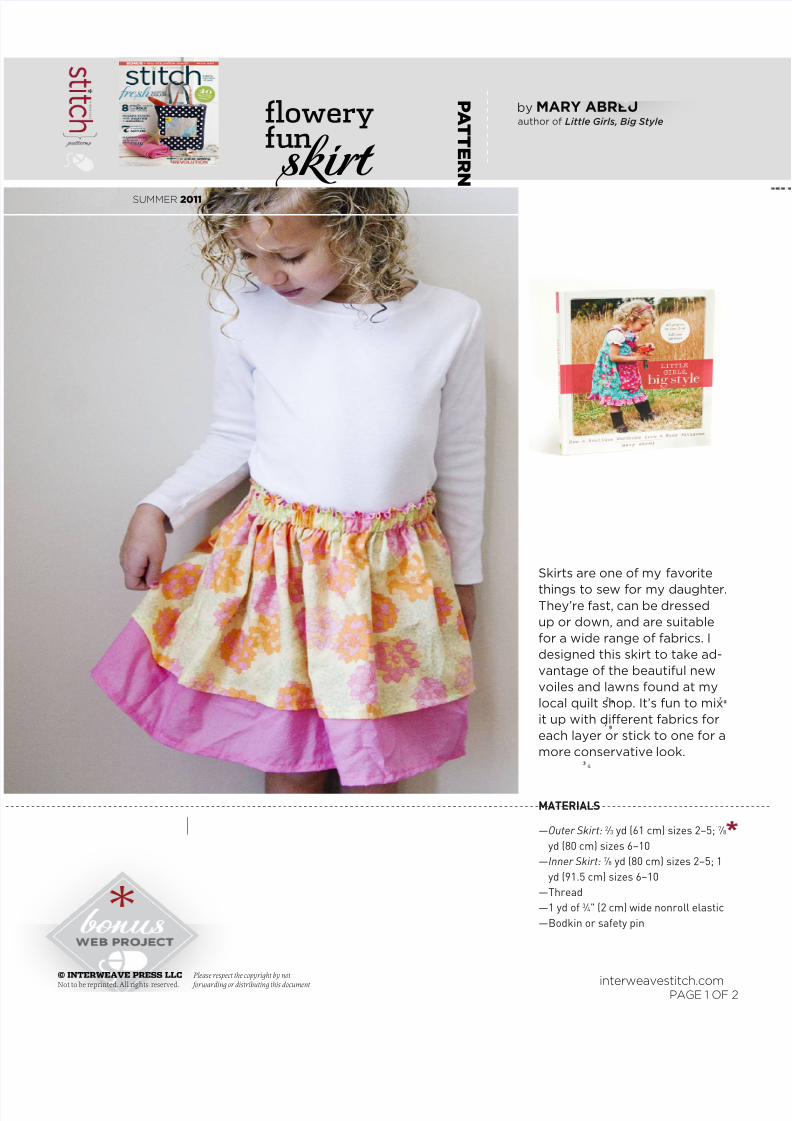
© INTERWEAVE PRESS LLC Not to be reprinted. All rights reserved. Please respect the copyright by not forwarding or distributing this document interweavestitch.com PAGE 1 OF 2 author of Little Girls, Big Style skirt flowery fu n P A T T E R N by MARY ABREU SUMMER 2011 Skirts are one of my favorite things to sew for my daughter. They’re fast, can be dressed up or down, and are suitable for a wide range of fabrics. I designed this skirt to take ad- vantage of the beautiful new voiles and lawns found at my local quilt shop. It’s fun to mix it up with different fabrics for each layer or stick to one for a more conservative look. MATERIALS —Outer Skirt: 2 ⁄ 3 yd (61 cm) sizes 2–5; 7 ⁄ 8 yd (80 cm) sizes 6–10 —Inner Skirt: 7 ⁄ 8 yd (80 cm) sizes 2–5; 1 yd (91.5 cm) sizes 6–10 —Thread —1 yd o 3 ⁄ 4" (2 cm) wide nonroll elastic —Bodkin or saety pin
Transcript of pollerita niña
8/6/2019 pollerita niña
http://slidepdf.com/reader/full/pollerita-nina 1/2
© INTERWEAVE PRESS LLC
Not to be reprinted. All rights reserved.
Please respect the copyright by not
forwarding or distributing this document interweavestitch.com PAGE 1 OF 2
author of Little Girls, Big Style
skirt floweryfun
P AT T E RN
by MARY ABREU
SUMMER 2011
Skirts are one of my favorite
things to sew for my daughter.They’re fast, can be dressed
up or down, and are suitable
for a wide range of fabrics. I
designed this skirt to take ad-
vantage of the beautiful new
voiles and lawns found at my
local quilt shop. It’s fun to mix
it up with different fabrics for
each layer or stick to one for a
more conservative look.
MATERIALS
—Outer Skirt: 2 ⁄ 3 yd (61 cm) sizes 2–5; 7 ⁄ 8
yd (80 cm) sizes 6–10
—Inner Skirt: 7 ⁄ 8 yd (80 cm) sizes 2–5; 1
yd (91.5 cm) sizes 6–10
—Thread
—1 yd o 3 ⁄ 4" (2 cm) wide nonroll elastic
—Bodkin or saety pin
8/6/2019 pollerita niña
http://slidepdf.com/reader/full/pollerita-nina 2/2
© INTERWEAVE PRESS LLC
Not to be reprinted. All rights reserved.
Please respect the copyright by not
forwarding or distributing this document interweavestitch.com PAGE 2 OF 2
SUMMER 2011
1Place the outer skirt panels right sides
together and sew along the short edges
with a ½" (1.3 cm) seam allowance. Finish
the seams using a serger, an overcast
stitch, or by pinking the edges, and press
open.
2Hem the outer skirt by pressing under
the bottom edge ¼" (6 mm) to the wrong
side, then old over another ¼" (6 mm).Stitch close to the inner olded edge to
secure. Set aside the outer skirt.
3Repeat Steps 1 and 2 with the inner skirt
panels.
4Turn both skirt sections right side out.
5Place the outer skirt inside the inner
skirt. The right side o the outer skirt
should be against the wrong side o the
inner skirt.
6Pin along the top edges, matching the
side seams frst. Sew all the way aroundthe top edge with a ½" (1.3 cm) seam al-
lowance.
7Trim the seam allowance to ¼" (6 mm),
then press the lining (inner skirt) up toward
the seam allowance.
8Understitch the lining (inner skirt) to the
seam allowance by topstitching along the
edge o the inner skirt close to the seam
joining the two skirts.
9Tuck the inner skirt inside the outer skirt
and press well.
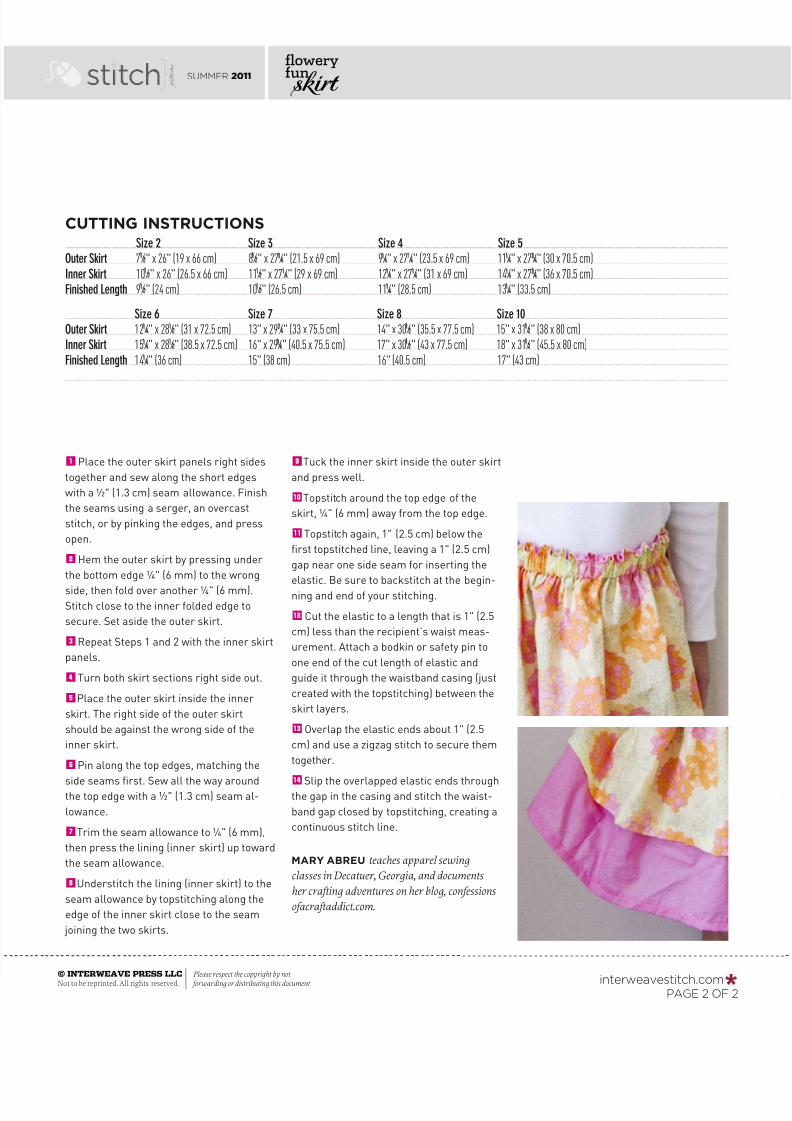
0Topstitch around the top edge o the
skirt, ¼" (6 mm) away rom the top edge.
-Topstitch again, 1" (2.5 cm) below the
frst topstitched line, leaving a 1" (2.5 cm)
gap near one side seam or inserting the
elastic. Be sure to backstitch at the begin-
ning and end o your stitching.
=Cut the elastic to a length that is 1" (2.5
cm) less than the recipient’s waist meas-
urement. Attach a bodkin or saety pin to
one end o the cut length o elastic and
guide it through the waistband casing (just
created with the topstitching) between the
skirt layers.
qOverlap the elastic ends about 1" (2.5
cm) and use a zigzag stitch to secure them
together.
wSlip the overlapped elastic ends throughthe gap in the casing and stitch the waist-
band gap closed by topstitching, creating a
continuous stitch line.
MARY ABREU teaches apparel sewing
classes in Decatuer, Georgia, and documents
her crafting adventures on her blog, confessions
ofacraftaddict.com.
skirt floweryfun
Size 2 Size 3 Size 4 Size 5Outer Skirt 71 ⁄ 2" x 26" (19 x 66 cm) 81 ⁄ 2" x 271 ⁄ 4" (21.5 x 69 cm) 91 ⁄ 4" x 271 ⁄ 4" (23.5 x 69 cm) 111 ⁄ 4" x 273 ⁄ 4" (30 x 70.5 cm)
Inner Skirt 101 ⁄ 2" x 26" (26.5 x 66 cm) 111 ⁄ 2" x 271 ⁄ 4" (29 x 69 cm) 121 ⁄ 4" x 271 ⁄ 4" (31 x 69 cm) 141 ⁄ 4" x 273 ⁄ 4" (36 x 70.5 cm)
Finished Length 91 ⁄ 2" (24 cm) 101 ⁄ 2" (26.5 cm) 111 ⁄ 4" (28.5 cm) 131 ⁄ 4" (33.5 cm)
CUTTING INSTRUCTIONS
Size 6 Size 7 Size 8 Size 10Outer Skirt 121 ⁄ 4" x 281 ⁄ 2" (31 x 72.5 cm) 13" x 293 ⁄ 4" (33 x 75.5 cm) 14" x 301 ⁄ 2" (35.5 x 77.5 cm) 15" x 311 ⁄ 2" (38 x 80 cm)
Inner Skirt 151 ⁄ 4" x 281 ⁄ 2" (38.5 x 72.5 cm) 16" x 293 ⁄ 4" (40.5 x 75.5 cm) 17" x 301 ⁄ 2" (43 x 77.5 cm) 18" x 311 ⁄ 2" (45.5 x 80 cm)
Finished Length 141 ⁄ 4" (36 cm) 15" (38 cm) 16" (40.5 cm) 17" (43 cm)