Braza Let Es
36
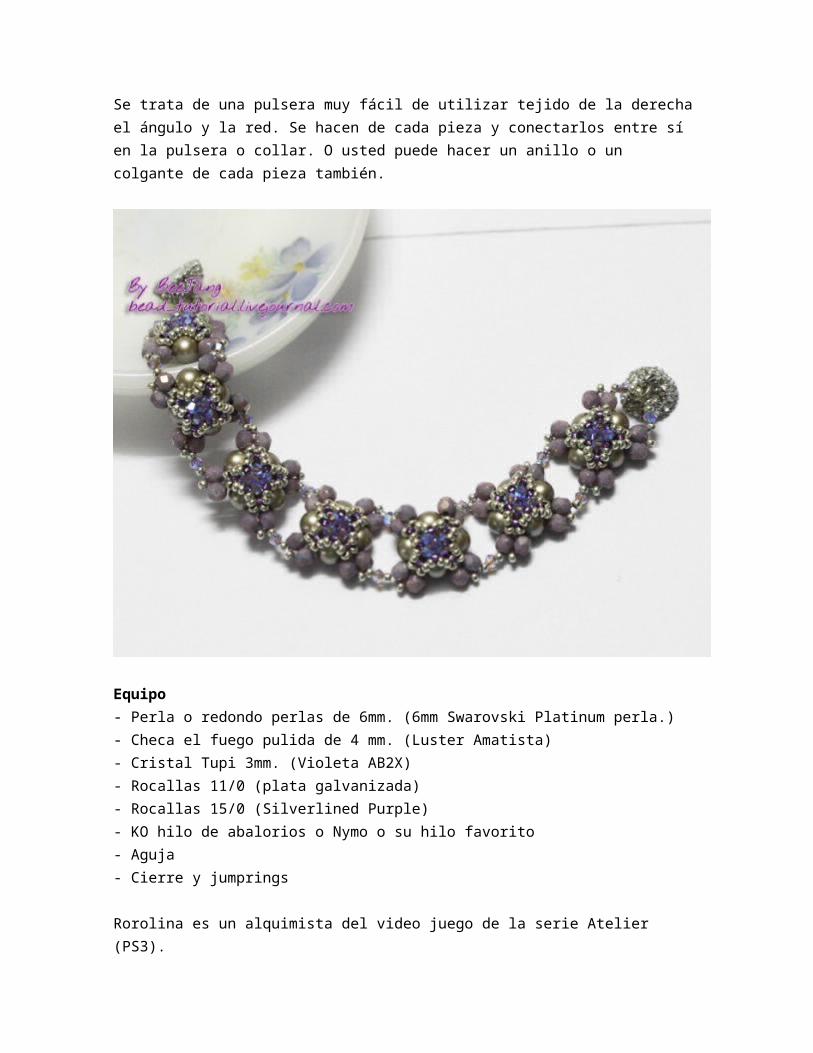
Se trata de una pulsera muy fácil de utilizar tejido de la derecha el ángulo y la red. Se hacen de cada pieza y conectarlos entre sí en la pulsera o collar. O usted puede hacer un anillo o un colgante de cada pieza también. Equipo - Perla o redondo perlas de 6mm. (6mm Swarovski Platinum perla.) - Checa el fuego pulida de 4 mm. (Luster Amatista) - Cristal Tupi 3mm. (Violeta AB2X) - Rocallas 11/0 (plata galvanizada) - Rocallas 15/0 (Silverlined Purple) - KO hilo de abalorios o Nymo o su hilo favorito - Aguja - Cierre y jumprings Rorolina es un alquimista del video juego de la serie Atelier (PS3).
-
Upload
osmary-ruiz -
Category
Documents
-
view
30 -
download
0
description
tutoriales tomado de la web
Transcript of Braza Let Es
Se trata de una pulsera muy fácil de utilizar tejido de la derecha el ángulo y la red. Se hacen de cada pieza y conectarlos entre sí en la pulsera o collar. O usted puede hacer un anillo o un colgante de cada pieza también.
Equipo - Perla o redondo perlas de 6mm. (6mm Swarovski Platinum perla.) - Checa el fuego pulida de 4 mm. (Luster Amatista) - Cristal Tupi 3mm. (Violeta AB2X) - Rocallas 11/0 (plata galvanizada) - Rocallas 15/0 (Silverlined Purple) - KO hilo de abalorios o Nymo o su hilo favorito - Aguja - Cierre y jumprings
Rorolina es un alquimista del video juego de la serie Atelier (PS3).
1.
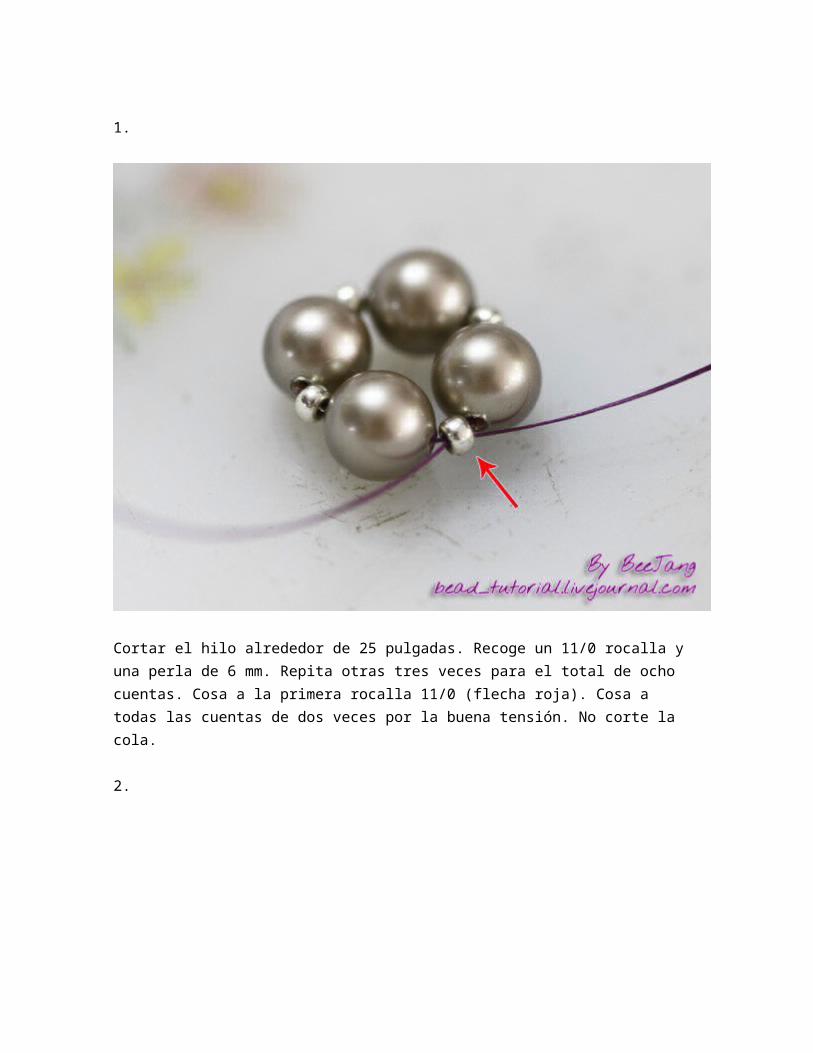
Cortar el hilo alrededor de 25 pulgadas. Recoge un 11/0 rocalla y una perla de 6 mm. Repita otras tres veces para el total de ocho cuentas. Cosa a la primera rocalla 11/0 (flecha roja). Cosa a todas las cuentas de dos veces por la buena tensión. No corte la cola.
2.
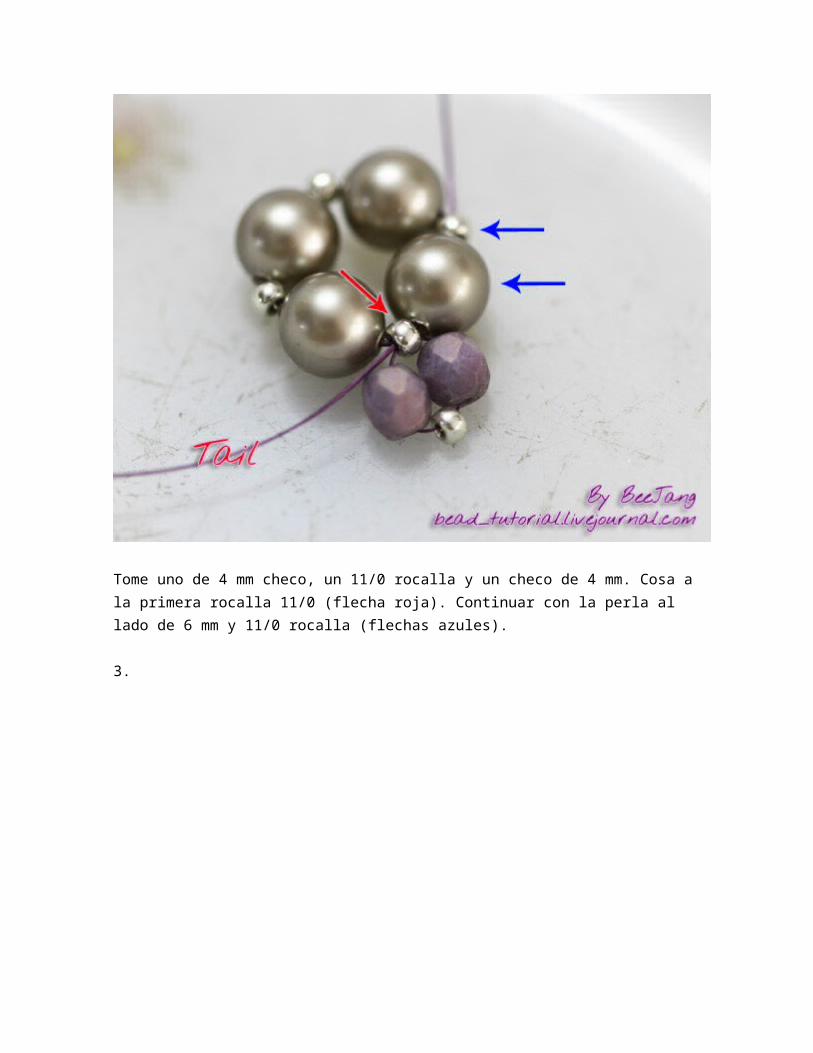
Tome uno de 4 mm checo, un 11/0 rocalla y un checo de 4 mm. Cosa a la primera rocalla 11/0 (flecha roja). Continuar con la perla al lado de 6 mm y 11/0 rocalla (flechas azules).
3.
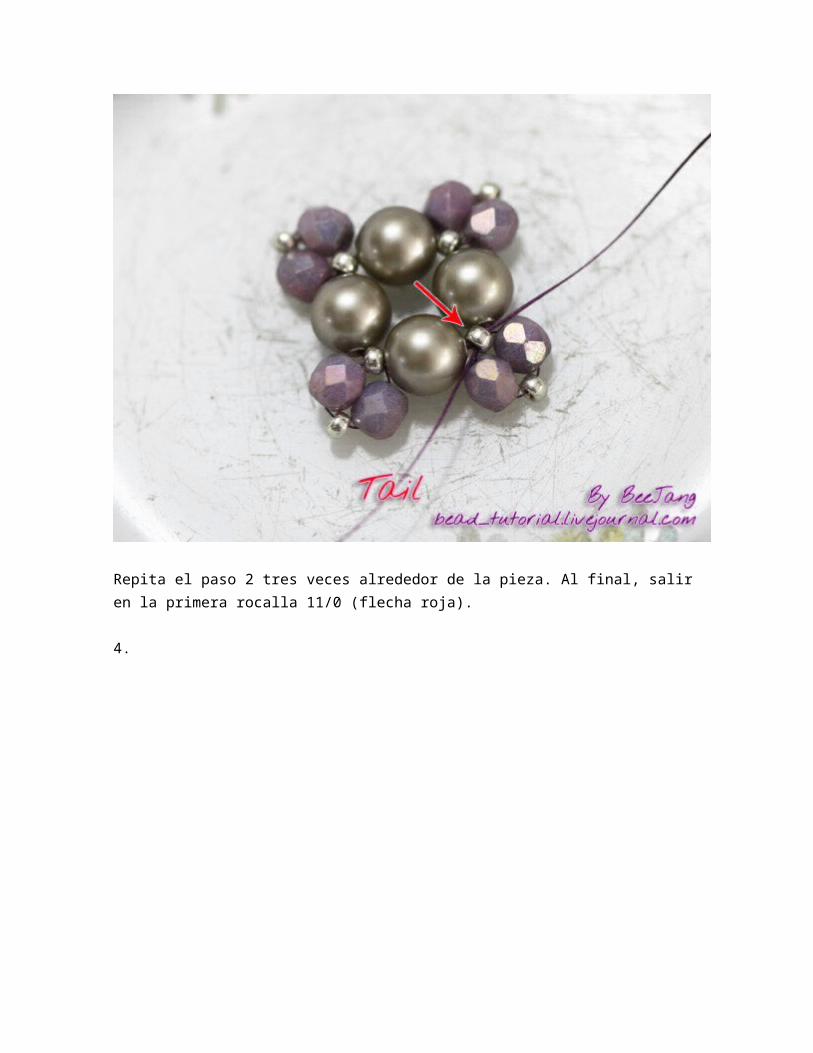
Repita el paso 2 tres veces alrededor de la pieza. Al final, salir en la primera rocalla 11/0 (flecha roja).
4.

Recoge seis 11/0 granos de la semilla. Saltar la perla y el tejido a la siguiente rocalla 11/0 (flecha roja).
5.
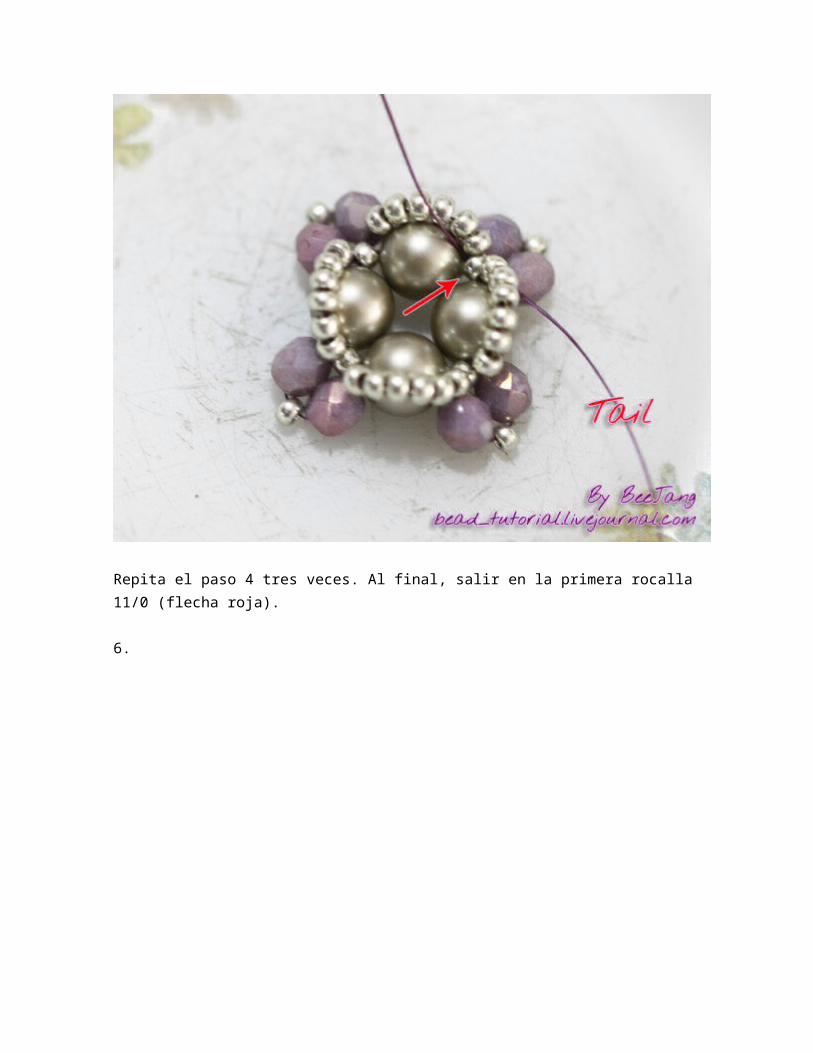
Repita el paso 4 tres veces. Al final, salir en la primera rocalla 11/0 (flecha roja).
6.
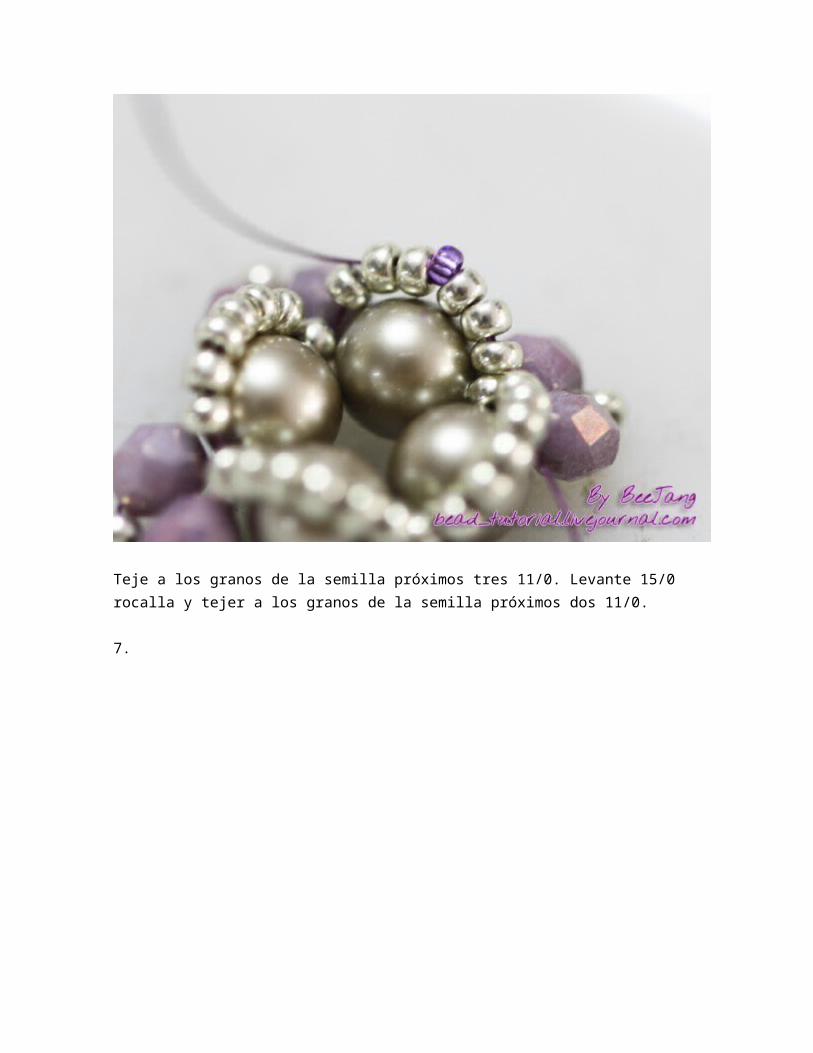
Teje a los granos de la semilla próximos tres 11/0. Levante 15/0 rocalla y tejer a los granos de la semilla próximos dos 11/0.
7.
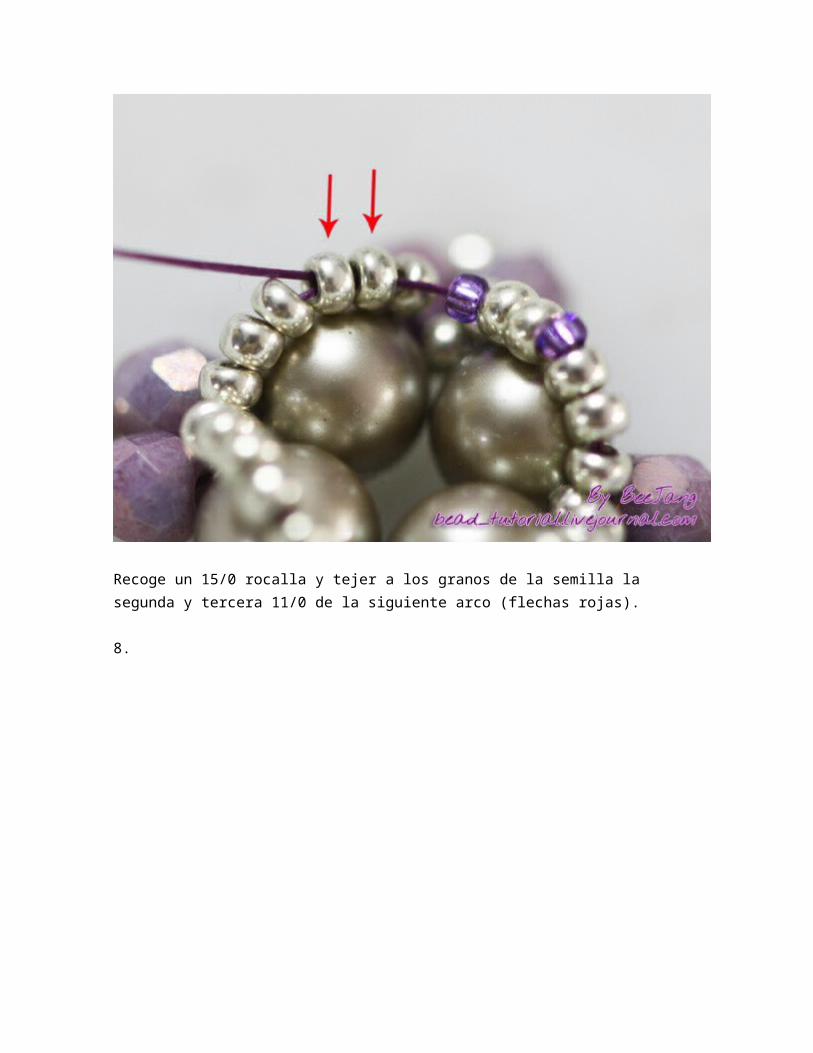
Recoge un 15/0 rocalla y tejer a los granos de la semilla la segunda y tercera 11/0 de la siguiente arco (flechas rojas).
8.
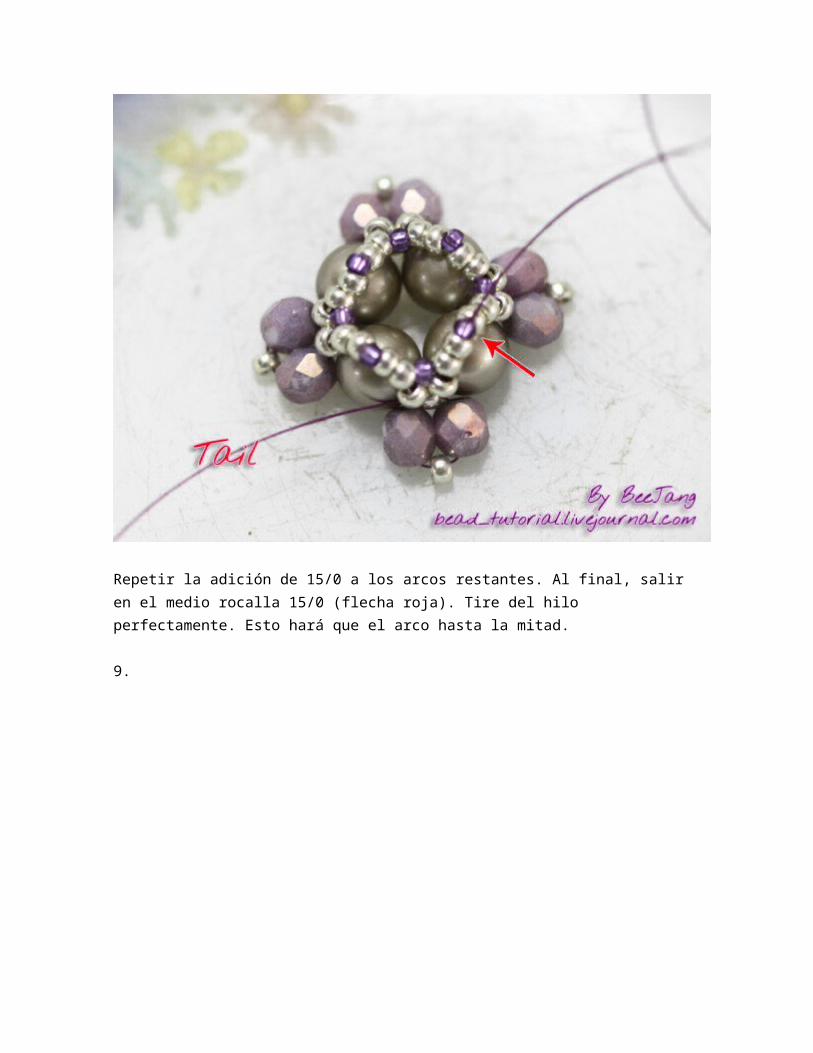
Repetir la adición de 15/0 a los arcos restantes. Al final, salir en el medio rocalla 15/0 (flecha roja). Tire del hilo perfectamente. Esto hará que el arco hasta la mitad.
9.
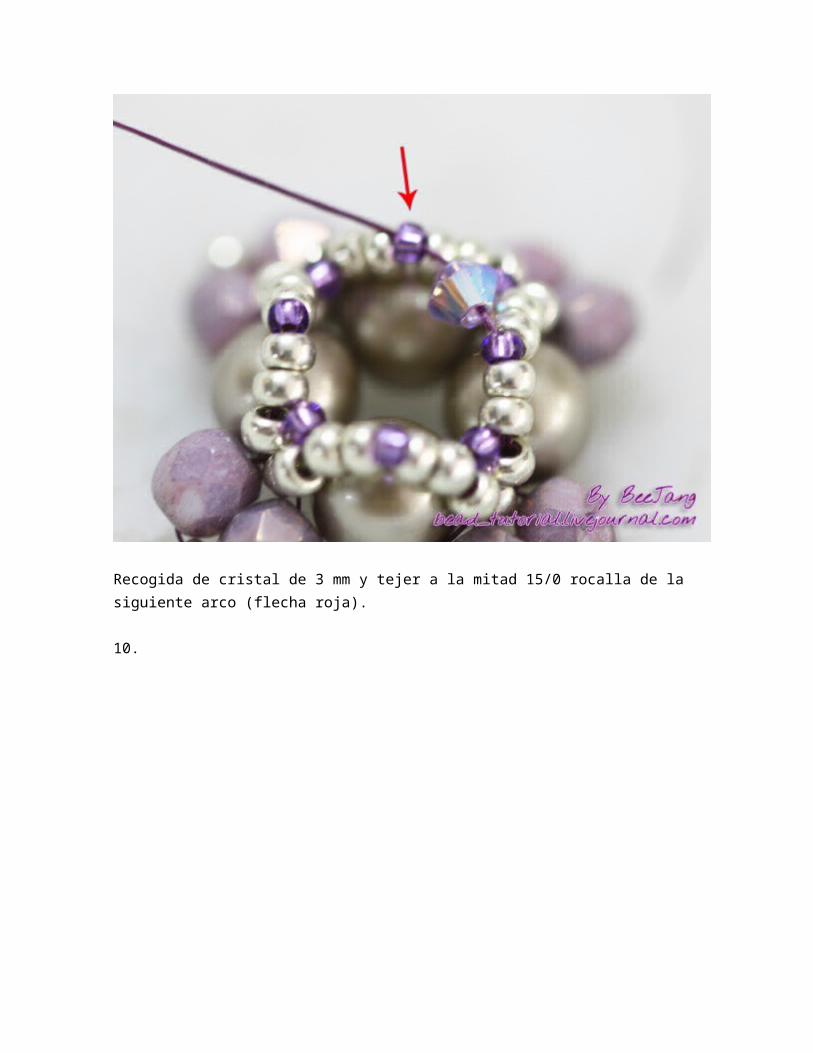
Recogida de cristal de 3 mm y tejer a la mitad 15/0 rocalla de la siguiente arco (flecha roja).
10.
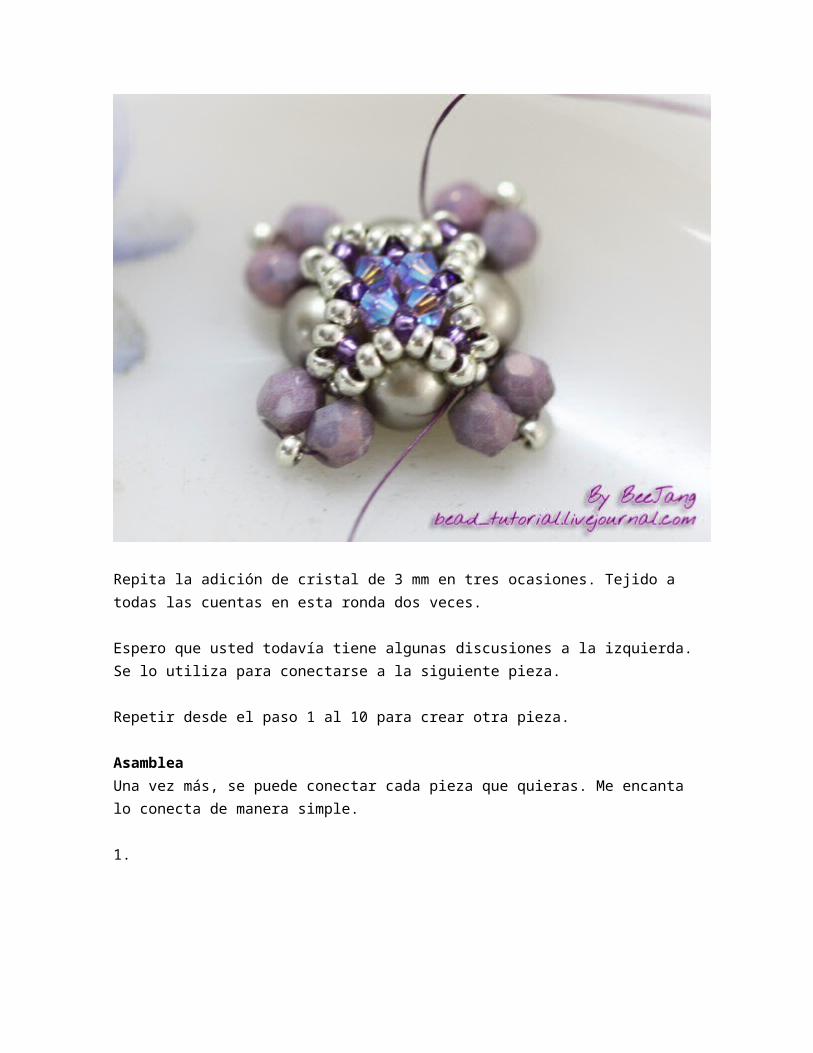
Repita la adición de cristal de 3 mm en tres ocasiones. Tejido a todas las cuentas en esta ronda dos veces.
Espero que usted todavía tiene algunas discusiones a la izquierda. Se lo utiliza para conectarse a la siguiente pieza.
Repetir desde el paso 1 al 10 para crear otra pieza.
Asamblea Una vez más, se puede conectar cada pieza que quieras. Me encanta lo conecta de manera simple.
1.
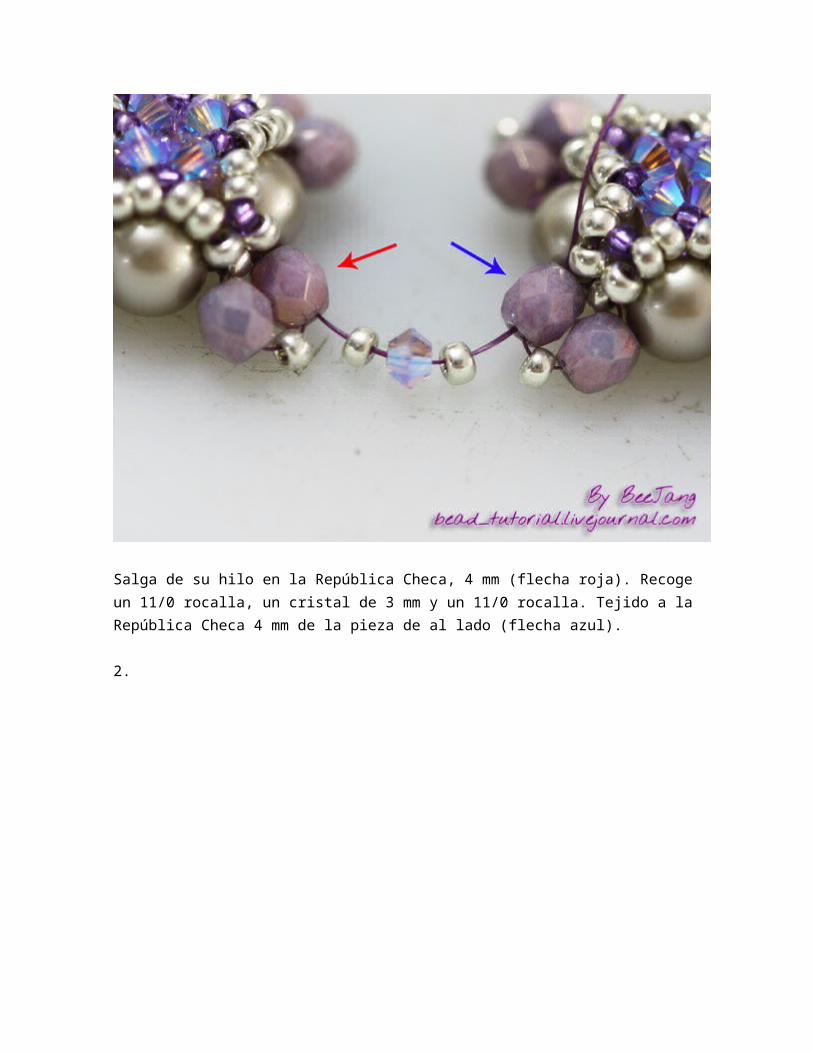
Salga de su hilo en la República Checa, 4 mm (flecha roja). Recoge un 11/0 rocalla, un cristal de 3 mm y un 11/0 rocalla. Tejido a la República Checa 4 mm de la pieza de al lado (flecha azul).
2.
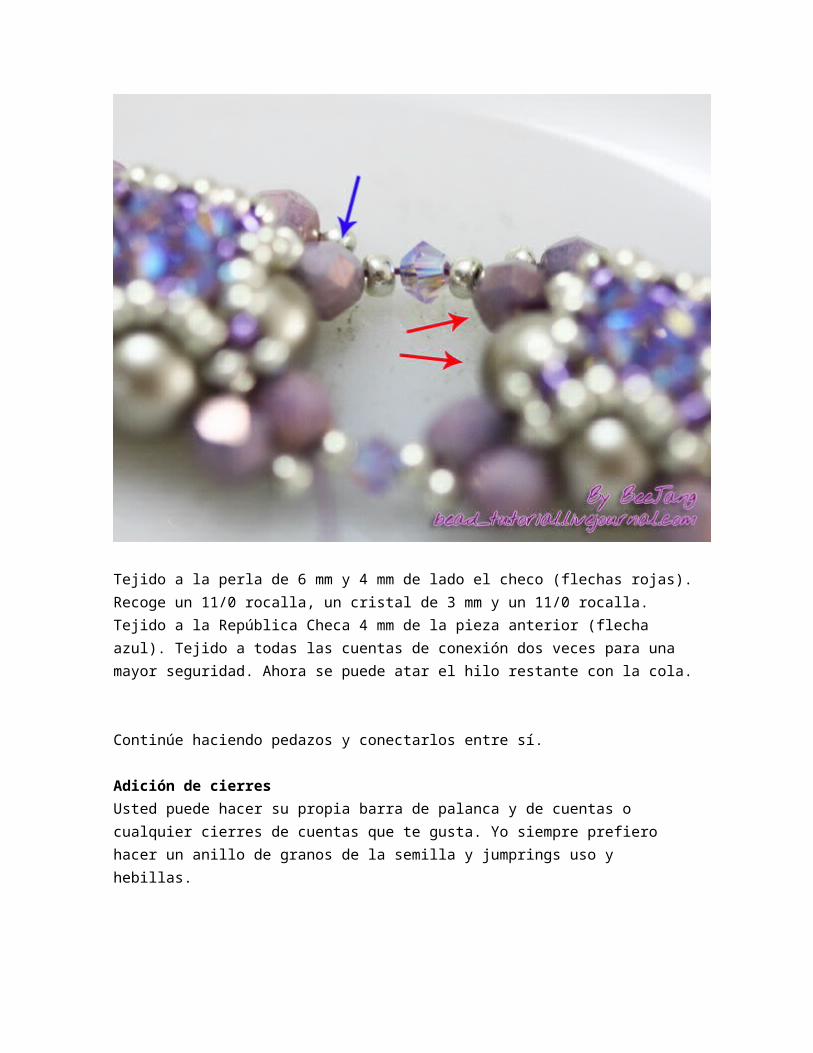
Tejido a la perla de 6 mm y 4 mm de lado el checo (flechas rojas). Recoge un 11/0 rocalla, un cristal de 3 mm y un 11/0 rocalla. Tejido a la República Checa 4 mm de la pieza anterior (flecha azul). Tejido a todas las cuentas de conexión dos veces para una mayor seguridad. Ahora se puede atar el hilo restante con la cola.
Continúe haciendo pedazos y conectarlos entre sí.
Adición de cierres Usted puede hacer su propia barra de palanca y de cuentas o cualquier cierres de cuentas que te gusta. Yo siempre prefiero hacer un anillo de granos de la semilla y jumprings uso y hebillas.
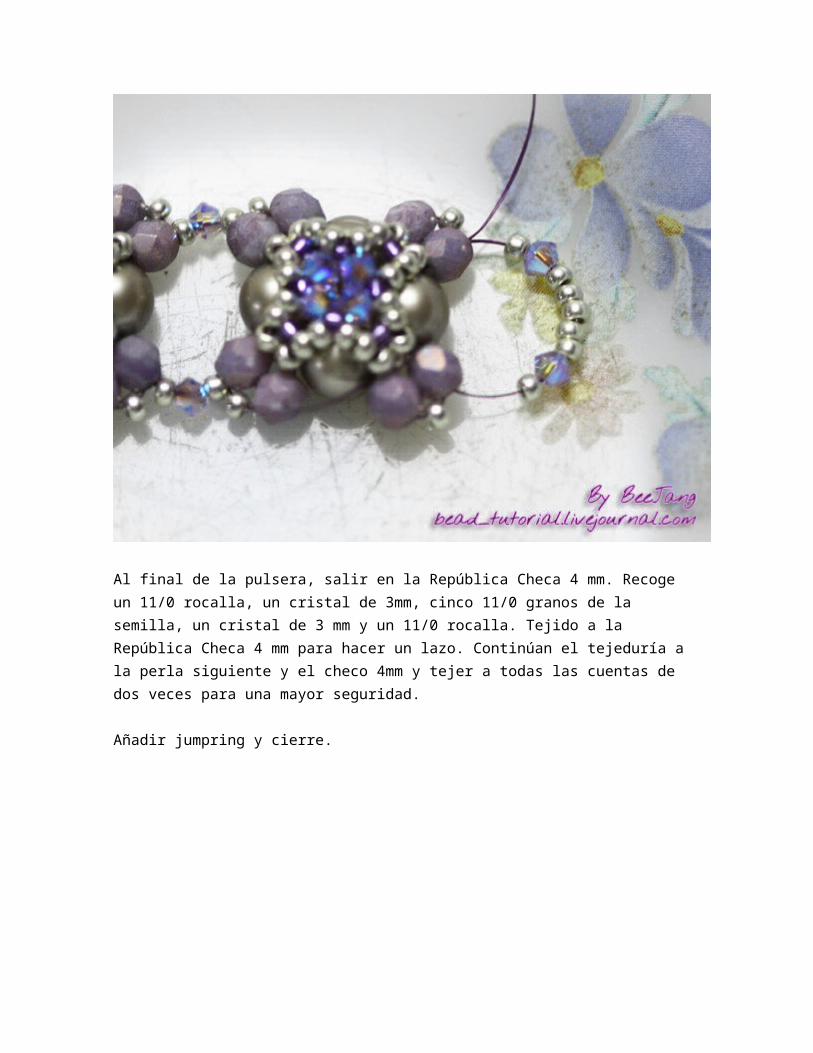
Al final de la pulsera, salir en la República Checa 4 mm. Recoge un 11/0 rocalla, un cristal de 3mm, cinco 11/0 granos de la semilla, un cristal de 3 mm y un 11/0 rocalla. Tejido a la República Checa 4 mm para hacer un lazo. Continúan el tejeduría a la perla siguiente y el checo 4mm y tejer a todas las cuentas de dos veces para una mayor seguridad.
Añadir jumpring y cierre.
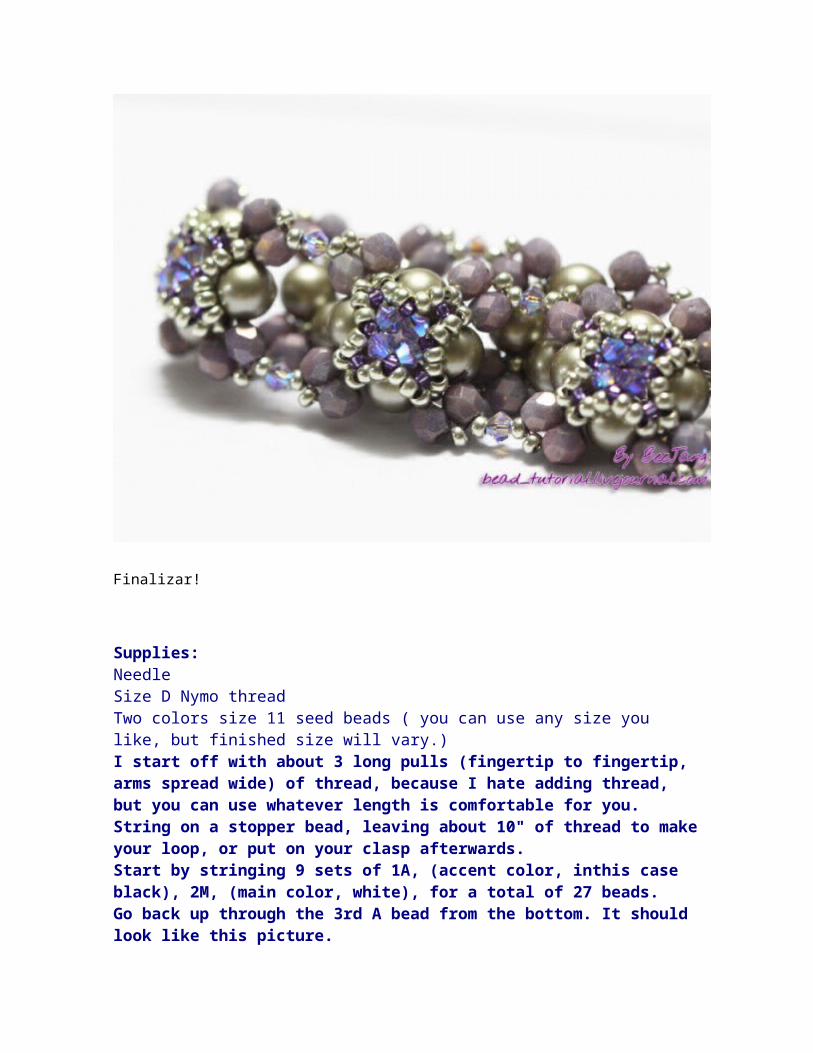
Finalizar!
Supplies: Needle Size D Nymo thread Two colors size 11 seed beads ( you can use any size you like, but finished size will vary.)I start off with about 3 long pulls (fingertip to fingertip, arms spread wide) of thread, because I hate adding thread, but you can use whatever length is comfortable for you. String on a stopper bead, leaving about 10" of thread to make your loop, or put on your clasp afterwards. Start by stringing 9 sets of 1A, (accent color, inthis case black), 2M, (main color, white), for a total of 27 beads. Go back up through the 3rd A bead from the bottom. It should look like this picture.Now add 2 M, 1 A, 2 M, skip next accent, and go up through the next accent bead. Keep your thread tension snug, but not so tight that it will buckle.Continue in this pattern to top, go through first accent bead you strung.
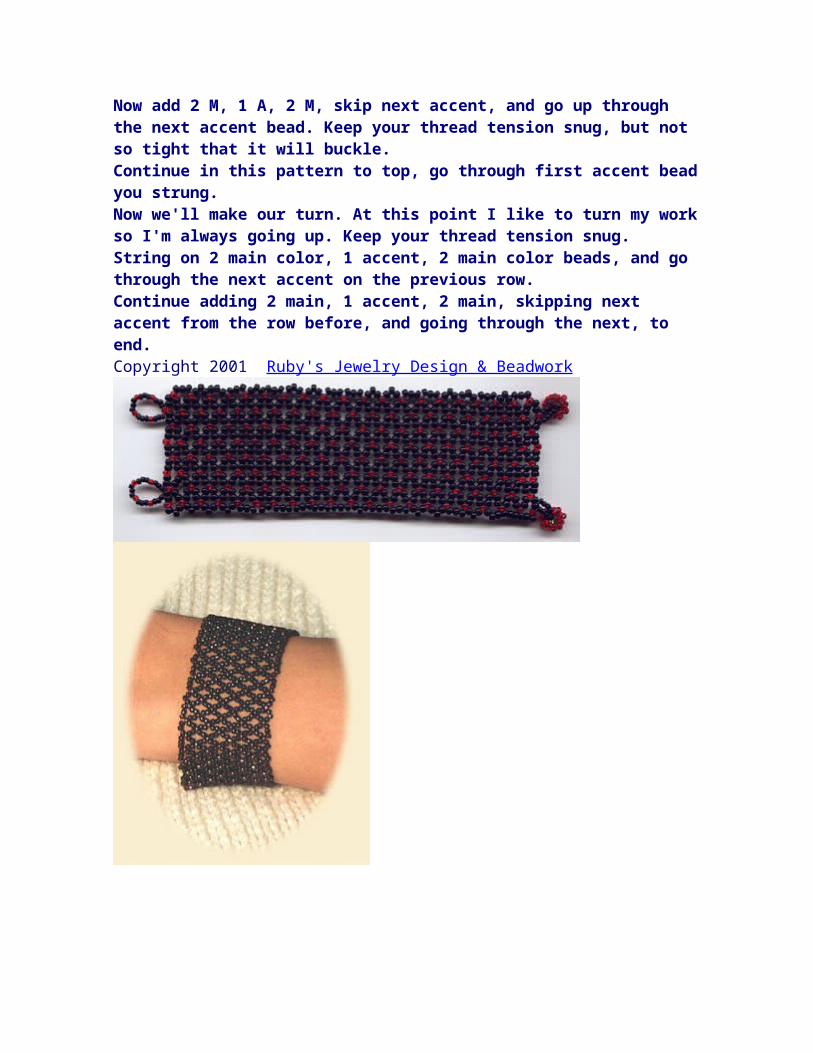
Now we'll make our turn. At this point I like to turn my work so I'm always going up. Keep your thread tension snug. String on 2 main color, 1 accent, 2 main color beads, and go through the next accent on the previous row. Continue adding 2 main, 1 accent, 2 main, skipping next accent from the row before, and going through the next, to end. Copyright 2001 Ruby's Jewelry Design & Beadwork
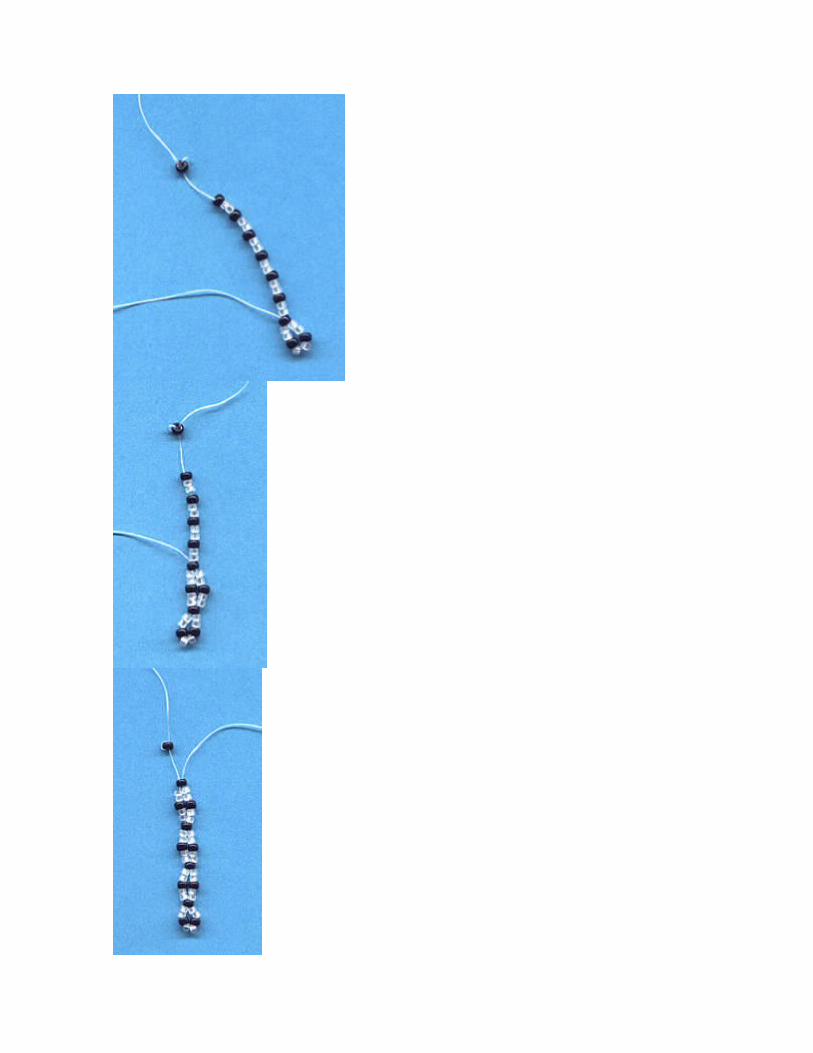
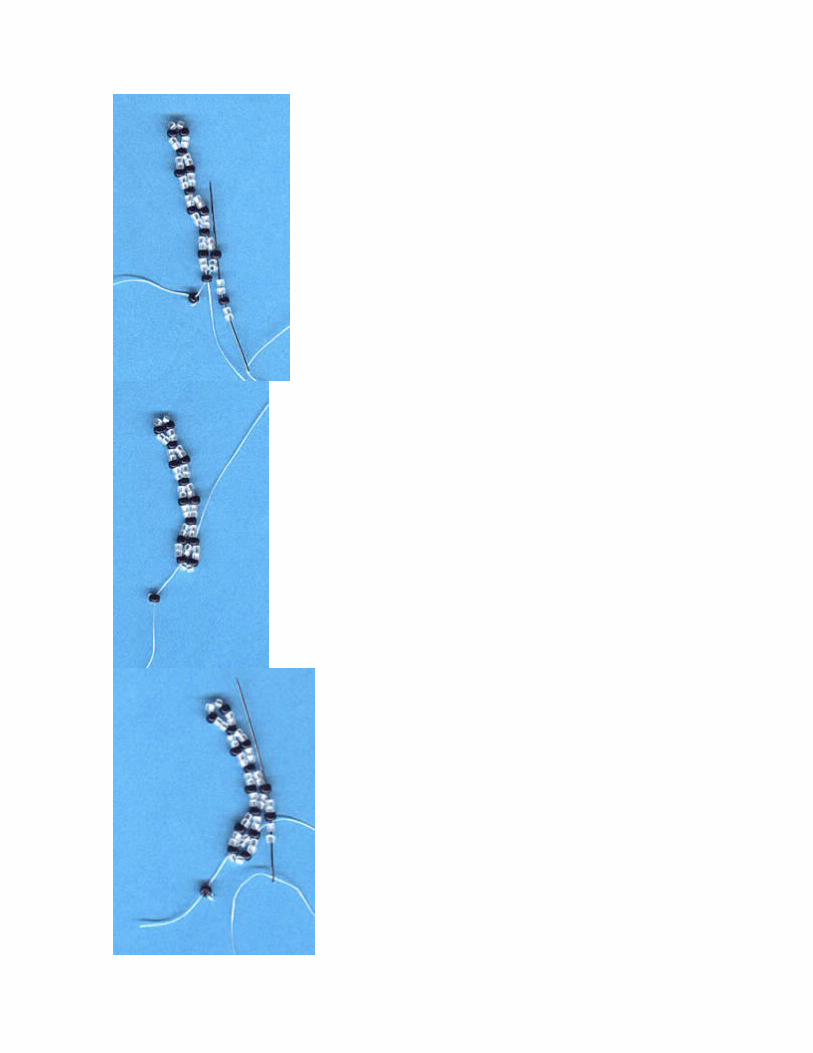
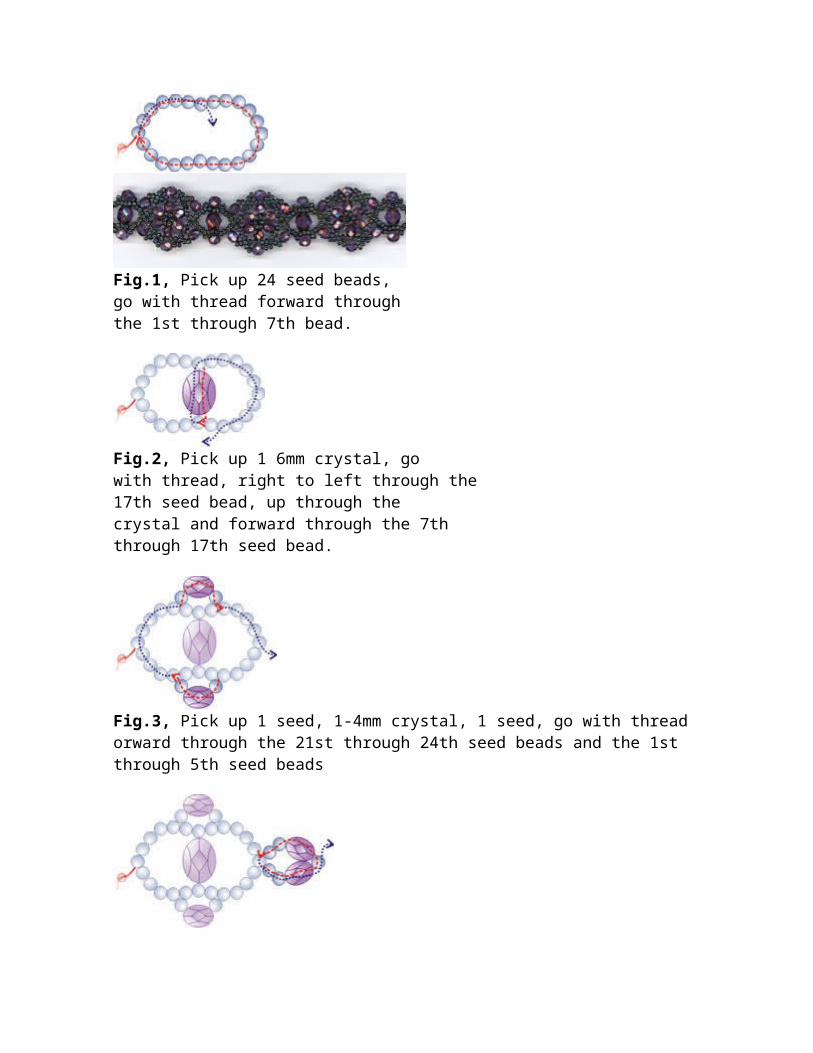
Fig.1, Pick up 24 seed beads,go with thread forward through the 1st through 7th bead.
Fig.2, Pick up 1 6mm crystal, gowith thread, right to left through the17th seed bead, up through the crystal and forward through the 7ththrough 17th seed bead.
Fig.3, Pick up 1 seed, 1-4mm crystal, 1 seed, go with thread orward through the 21st through 24th seed beads and the 1st through 5th seed beads
Fig.4, Pick up 2 seeds, 1-4mm crystal, 1 seed, 1-4mm crystal, 2 seeds, go withthread up through the seed bead, the thread is exiting and forward through
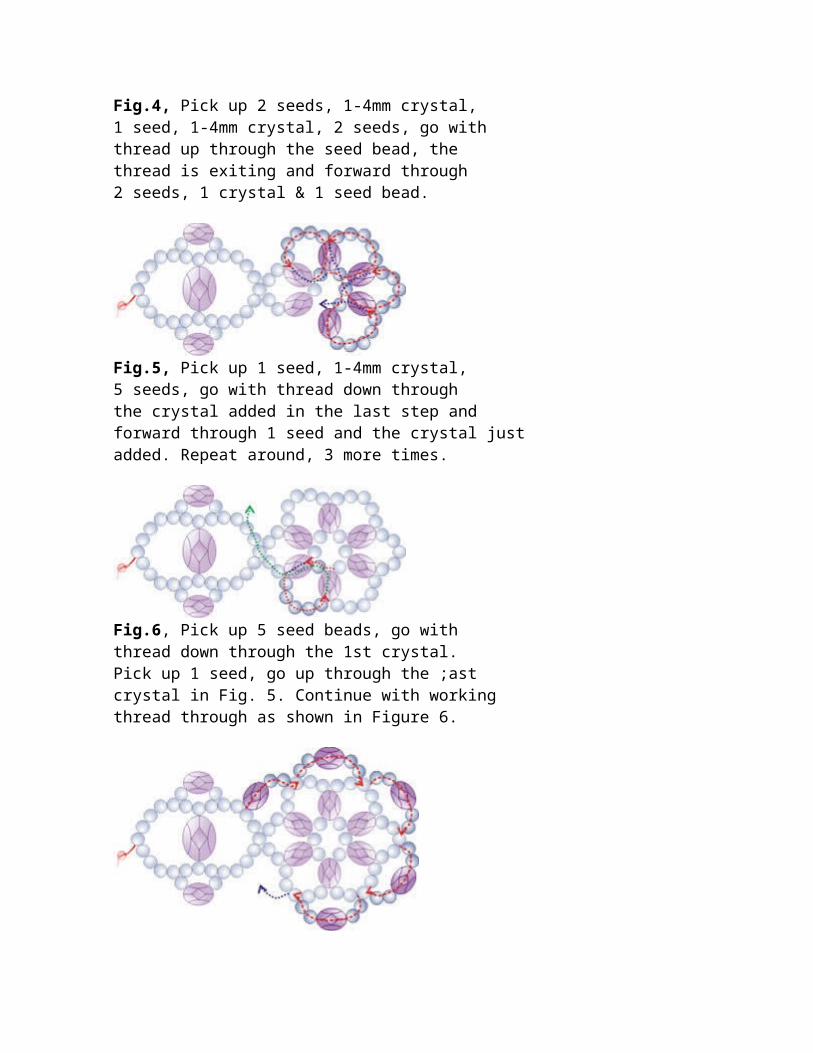
2 seeds, 1 crystal & 1 seed bead.
Fig.5, Pick up 1 seed, 1-4mm crystal, 5 seeds, go with thread down throughthe crystal added in the last step and forward through 1 seed and the crystal justadded. Repeat around, 3 more times.
Fig.6, Pick up 5 seed beads, go with thread down through the 1st crystal.Pick up 1 seed, go up through the ;astcrystal in Fig. 5. Continue with workingthread through as shown in Figure 6.
Fig.7, Pick up 1-4mm crystal, 2 seeds,go with thread forward through the 3rd seed bead. Pick up 2 seeds, 1 crystal,2 seeds, go with thread through the next3rd seed. Repeat around, 3 more times.
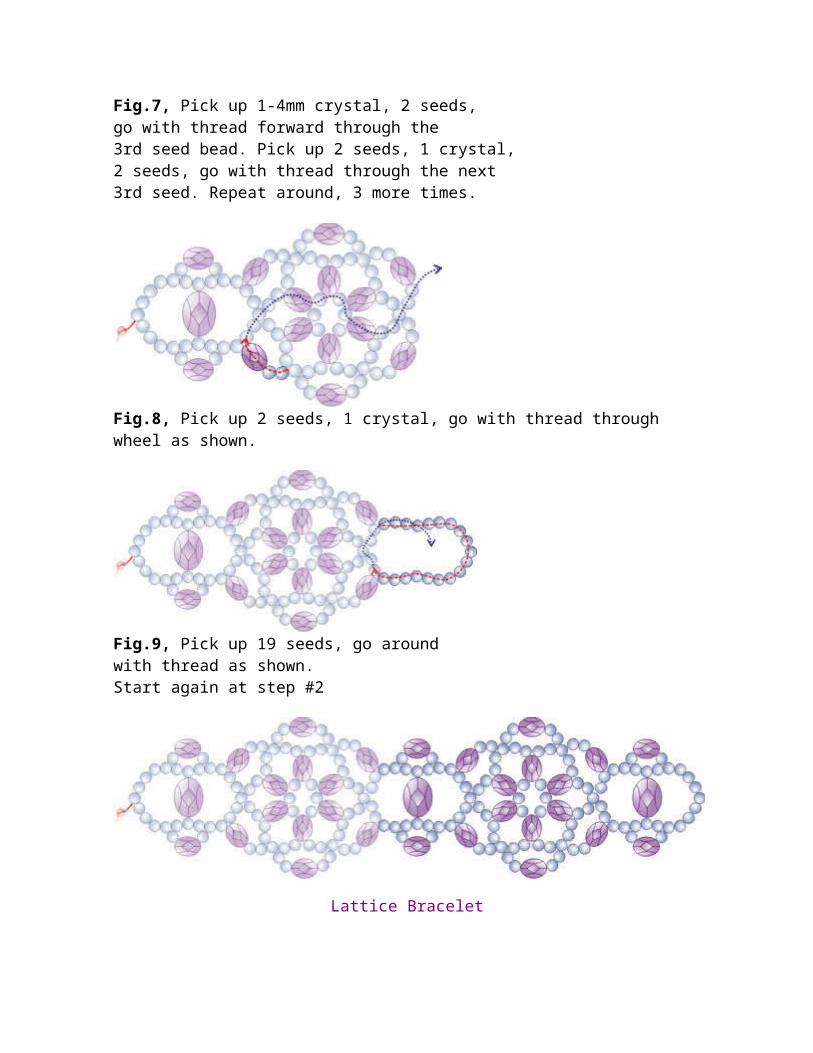
Fig.8, Pick up 2 seeds, 1 crystal, go with thread through wheel as shown.
Fig.9, Pick up 19 seeds, go aroundwith thread as shown.Start again at step #2
Lattice Bracelet
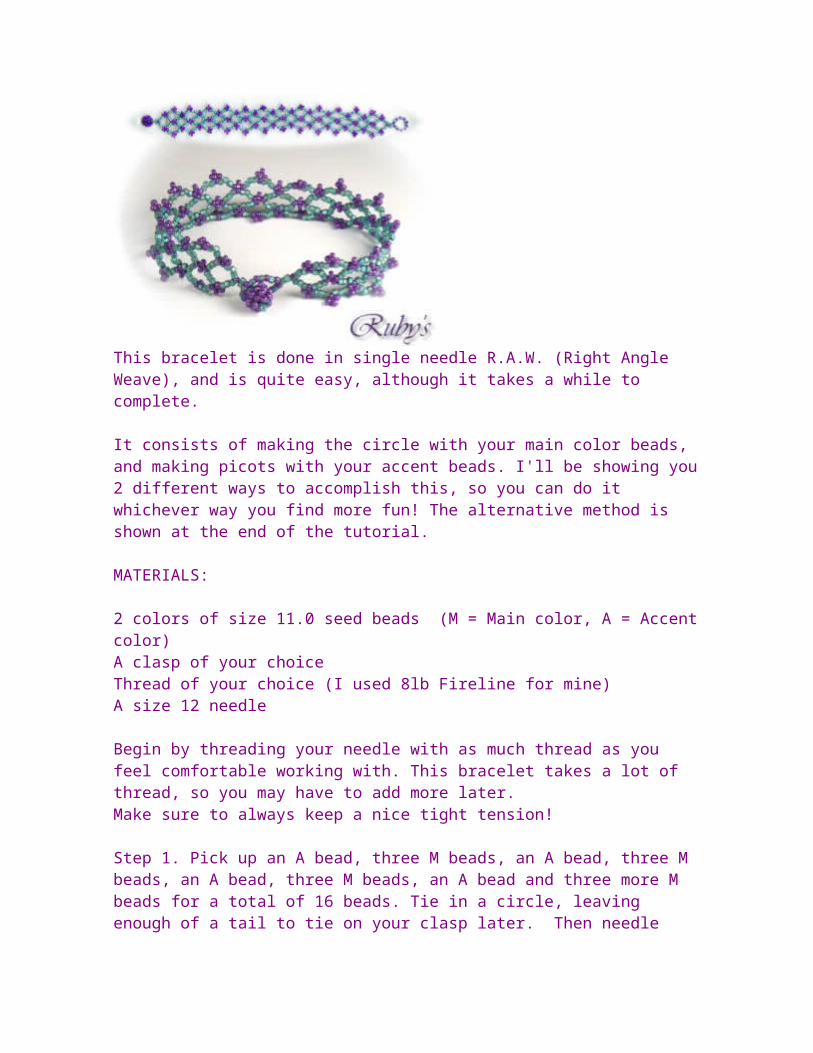
This bracelet is done in single needle R.A.W. (Right Angle Weave), and is quite easy, although it takes a while to complete.
It consists of making the circle with your main color beads, and making picots with your accent beads. I'll be showing you 2 different ways to accomplish this, so you can do it whichever way you find more fun! The alternative method is shown at the end of the tutorial.
MATERIALS:
2 colors of size 11.0 seed beads (M = Main color, A = Accent color)A clasp of your choiceThread of your choice (I used 8lb Fireline for mine)A size 12 needle
Begin by threading your needle with as much thread as you feel comfortable working with. This bracelet takes a lot of thread, so you may have to add more later. Make sure to always keep a nice tight tension!
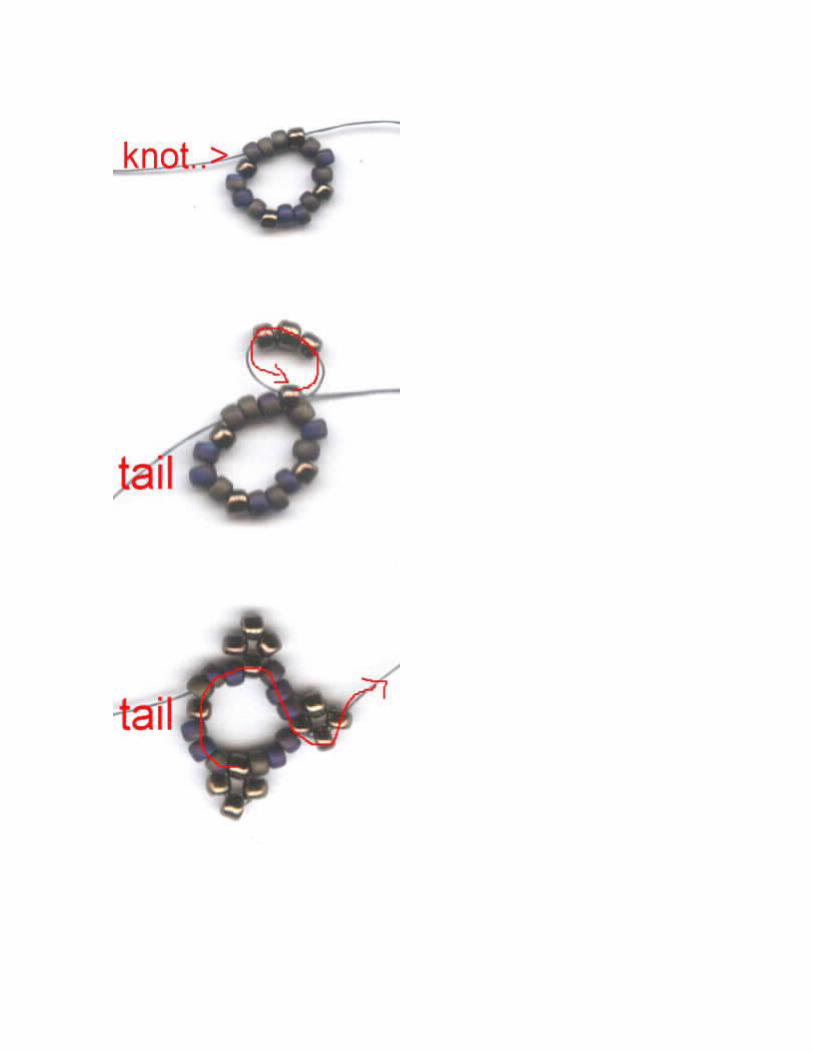
Step 1. Pick up an A bead, three M beads, an A bead, three M beads, an A bead, three M beads, an A bead and three more M beads for a total of 16 beads. Tie in a circle, leaving enough of a tail to tie on your clasp later. Then needle through three M beads and one A bead.
Step 2. Pick up 3 A beads, and making a circle, go back through the same bead that your thread is coming out of. Pull tight. This is your first picot!
Continue around the circle, making a picot in each of the next two A beads. Do not make a picot on the Accent bead by the knot.
When you've made your third picot, needle around the circle and through the two accent beads as shown.
You're now in position to make your next circle/picot.
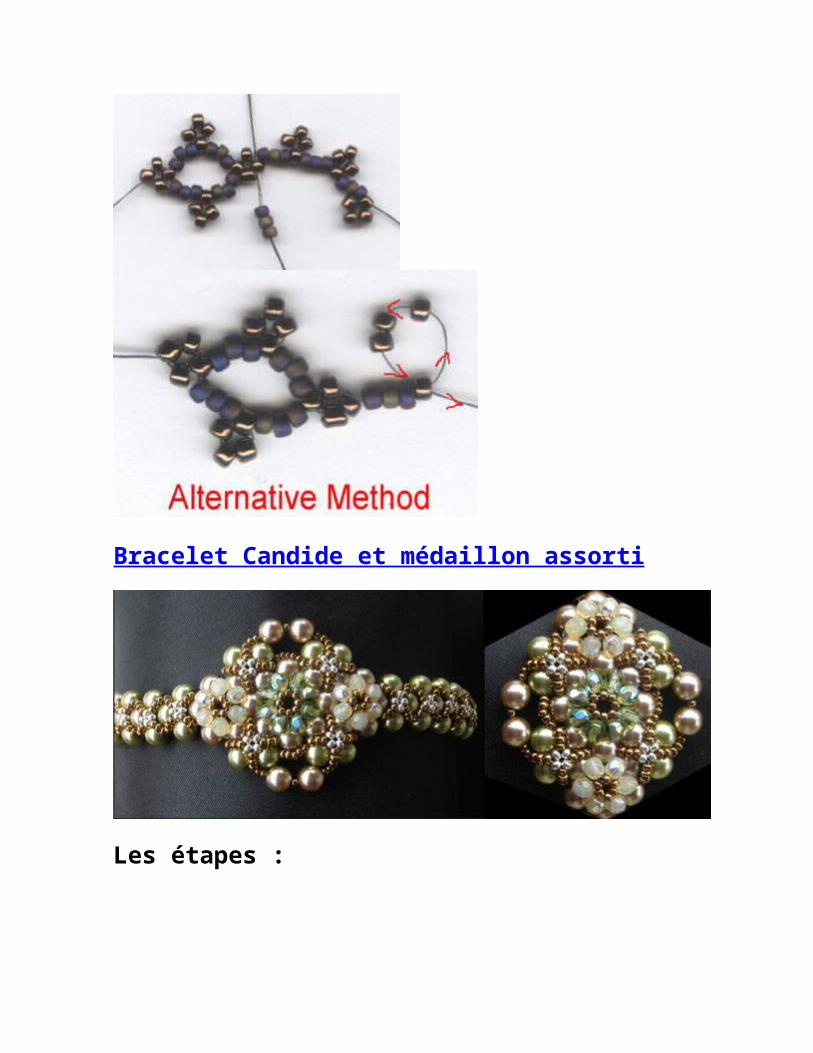
Below is the alternative method for making your rings and picots. You can do which ever works the best for you. I think that the bracelet has
more body if I use the first method, but either way is fine. :)In this method, you are making the picots as you go along instead of adding them after the ring is made.
Pick up 3M, and 4A. Go back through the first A bead to form your picot. PULL TIGHT!
Step 2. Continue to add 3M and 4A, making 3 picots, then go up through your side picot from the last round.
Needle around the ring as in the first method until you're coming out of the side bead of the side picot.
Remember to pull tight after each picot so you don't have thread showing!
Step 4. Pick up 3M, 1A, 3M, 1A, 3M, 1A, 3M, and going in a circle again, go up through the side picot bead that your thread is coming out of.
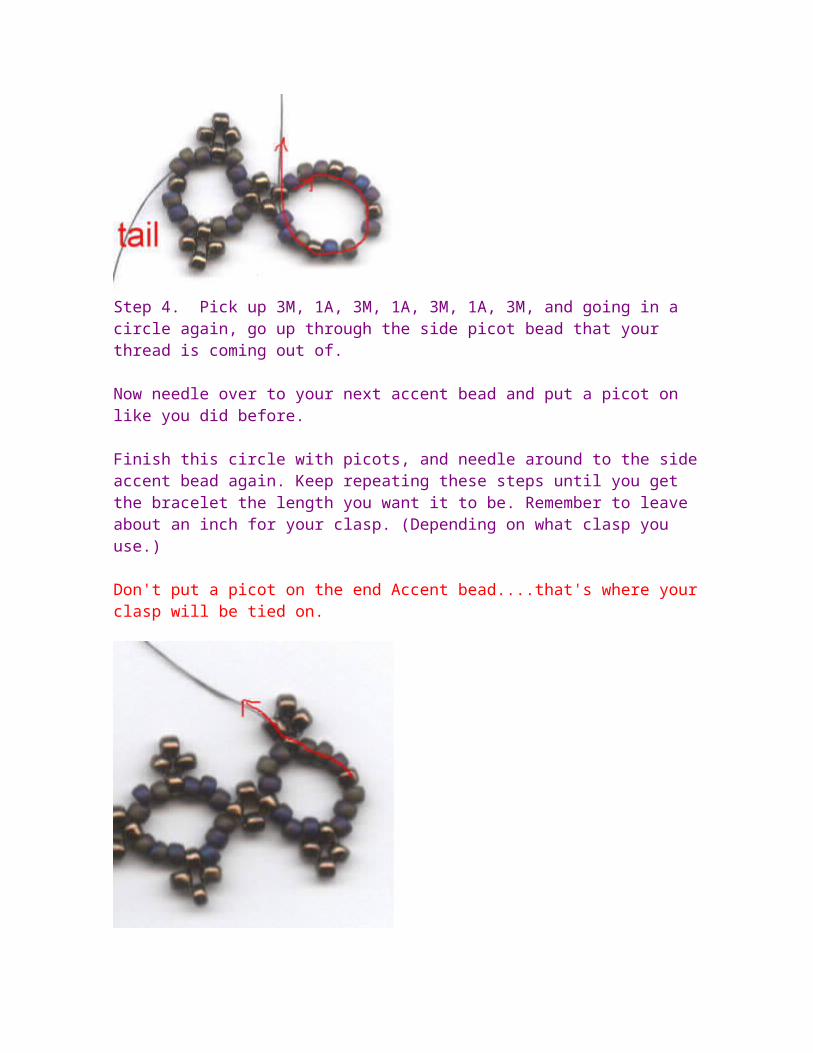
Now needle over to your next accent bead and put a picot on like you did before.
Finish this circle with picots, and needle around to the side accent bead again. Keep repeating these steps until you get the bracelet the length you want it to be. Remember to leave about an inch for your clasp. (Depending on what clasp you use.)
Don't put a picot on the end Accent bead....that's where your clasp will be tied on.
When you get to the end, make a picot on the top and bottom of this last loop, then needle around so your thread is coming out of the side picot bead (of the top picot) as shown. Now we're ready to make our second pass!
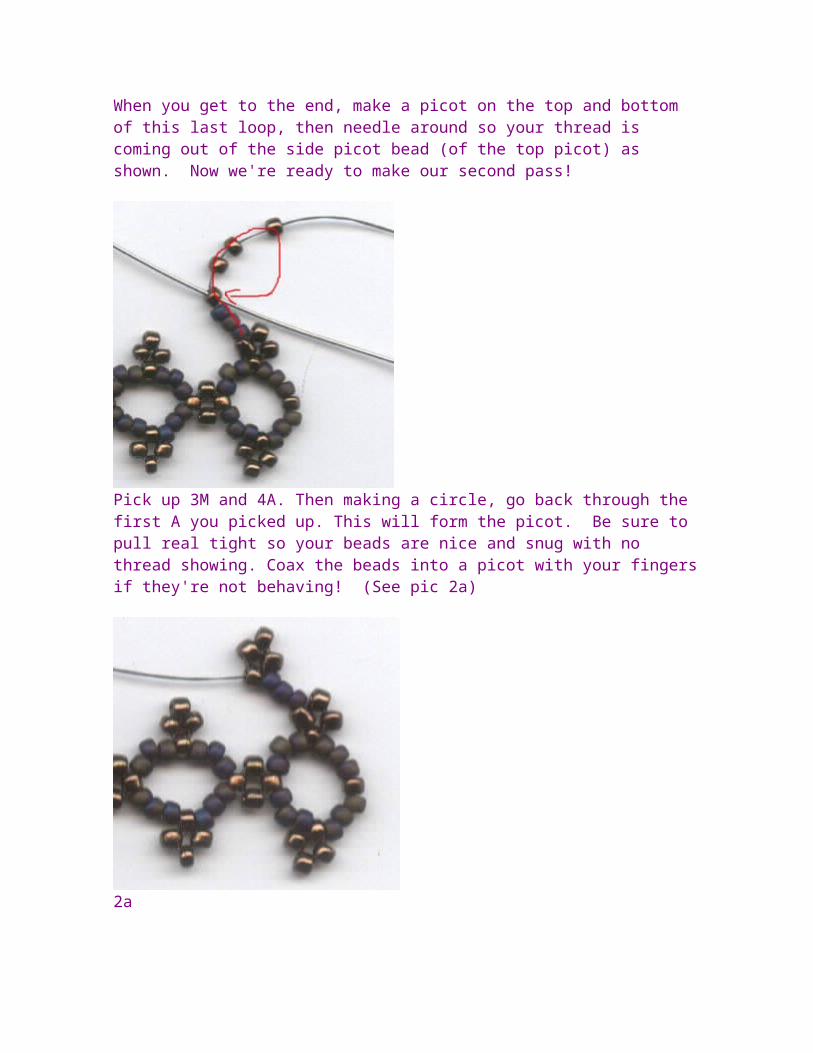
Pick up 3M and 4A. Then making a circle, go back through the first A you picked up. This will form the picot. Be sure to pull real tight so your beads are nice and snug with no thread showing. Coax the beads into a picot with your fingers if they're not behaving! (See pic 2a)
2a
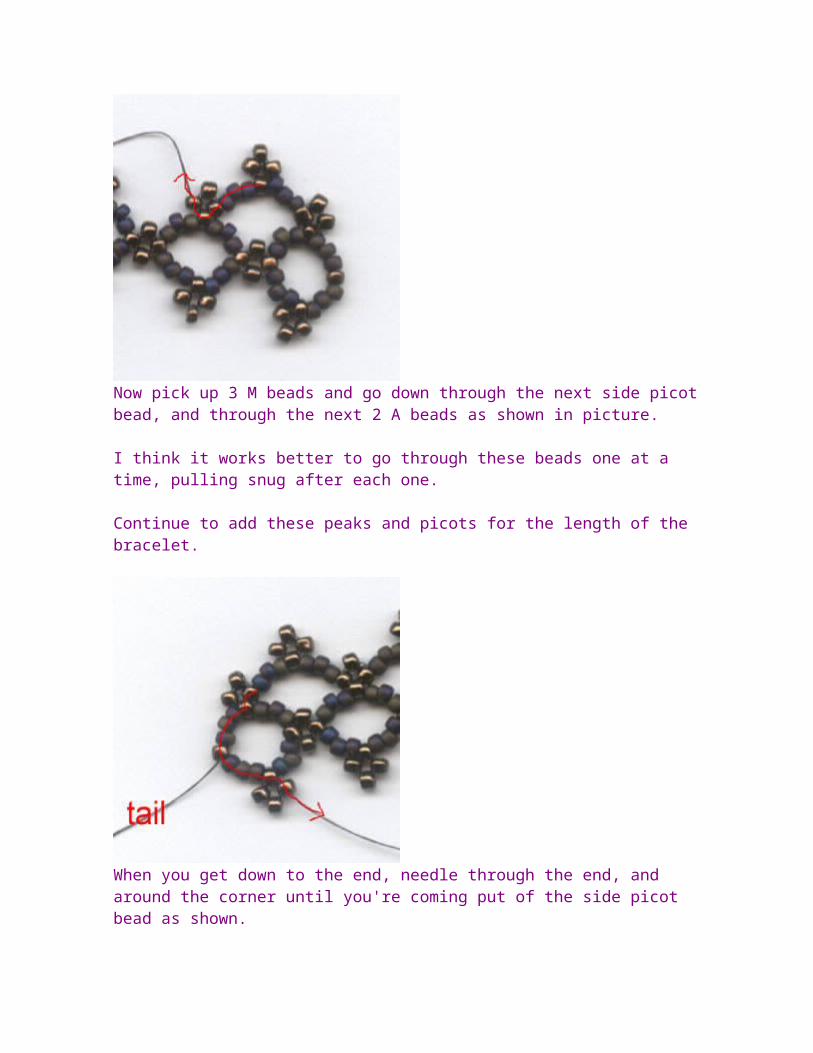
Now pick up 3 M beads and go down through the next side picot bead, and through the next 2 A beads as shown in picture.
I think it works better to go through these beads one at a time, pulling snug after each one.
Continue to add these peaks and picots for the length of the bracelet.
When you get down to the end, needle through the end, and around the corner until you're coming put of the side picot bead as shown.
Now just add your peaks and picots down the length of this side. :)
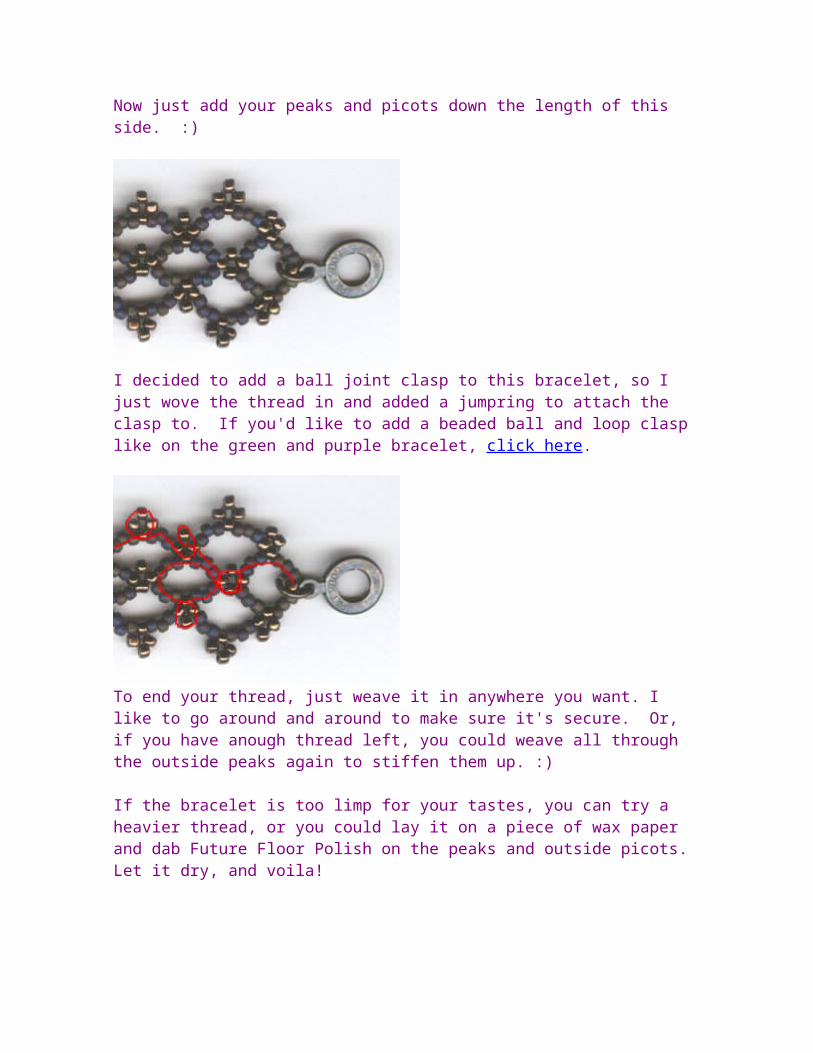
I decided to add a ball joint clasp to this bracelet, so I just wove the thread in and added a jumpring to attach the clasp to. If you'd like to add a beaded ball and loop clasp like on the green and purple bracelet, click here.
To end your thread, just weave it in anywhere you want. I like to go around and around to make sure it's secure. Or, if you have anough thread left, you could weave all through the outside peaks again to stiffen them up. :)
If the bracelet is too limp for your tastes, you can try a heavier thread, or you could lay it on a piece of wax paper and dab Future Floor Polish on the peaks and outside picots. Let it dry, and voila!
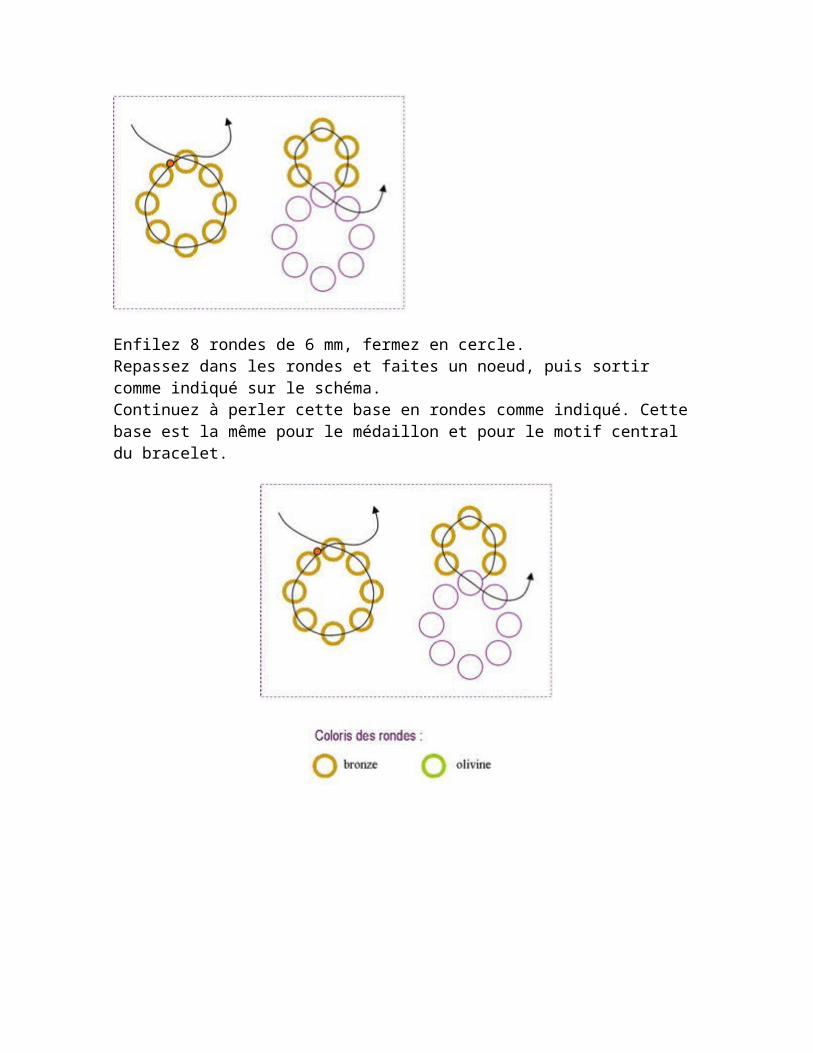
Enfilez 8 rondes de 6 mm, fermez en cercle.Repassez dans les rondes et faites un noeud, puis sortir comme indiqué sur le schéma. Continuez à perler cette base en rondes comme indiqué. Cette base est la même pour le médaillon et pour le motif central du bracelet.
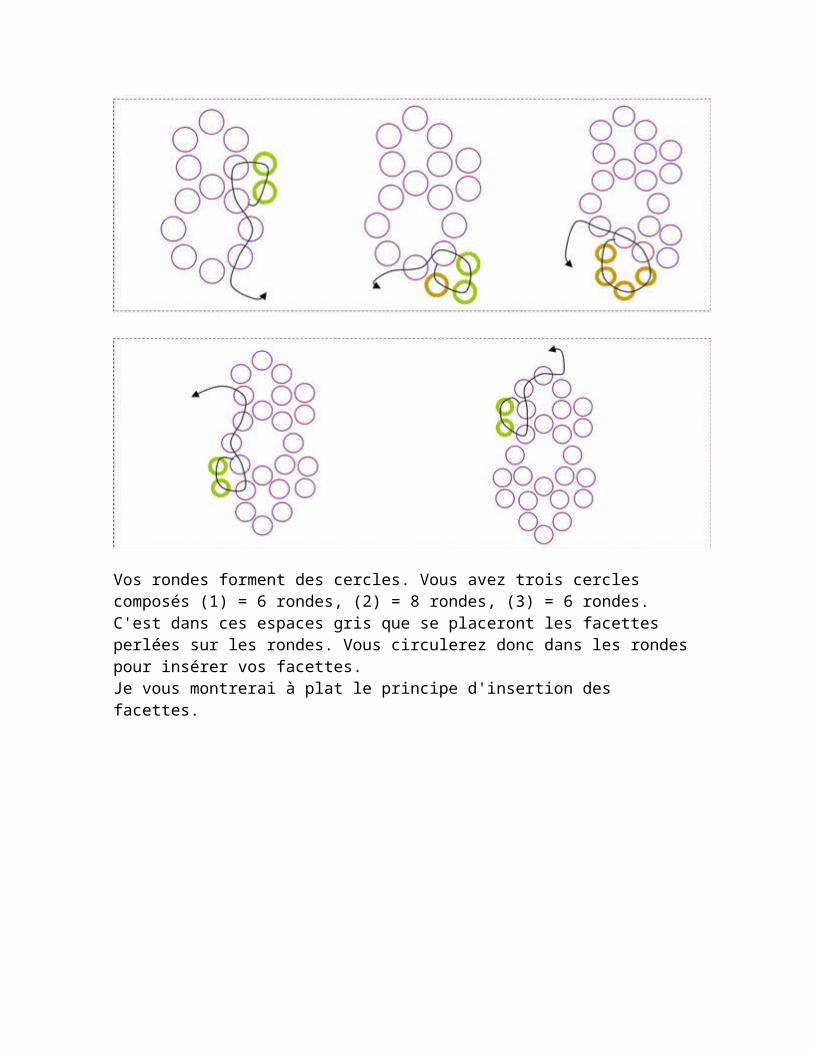
Vos rondes forment des cercles. Vous avez trois cercles composés (1) = 6 rondes, (2) = 8 rondes, (3) = 6 rondes. C'est dans ces espaces gris que se placeront les facettes perlées sur les rondes. Vous circulerez donc dans les rondes pour insérer vos facettes. Je vous montrerai à plat le principe d'insertion des facettes.
Vos rondes forment également 4 motifs de 4 rondes. C'est sur ces rondes que vous poserez les rocailles de 11. vous circulerez dans les rondes pour vous placer. Je vous montrerai à plat le principe d'insertion des rocailles.
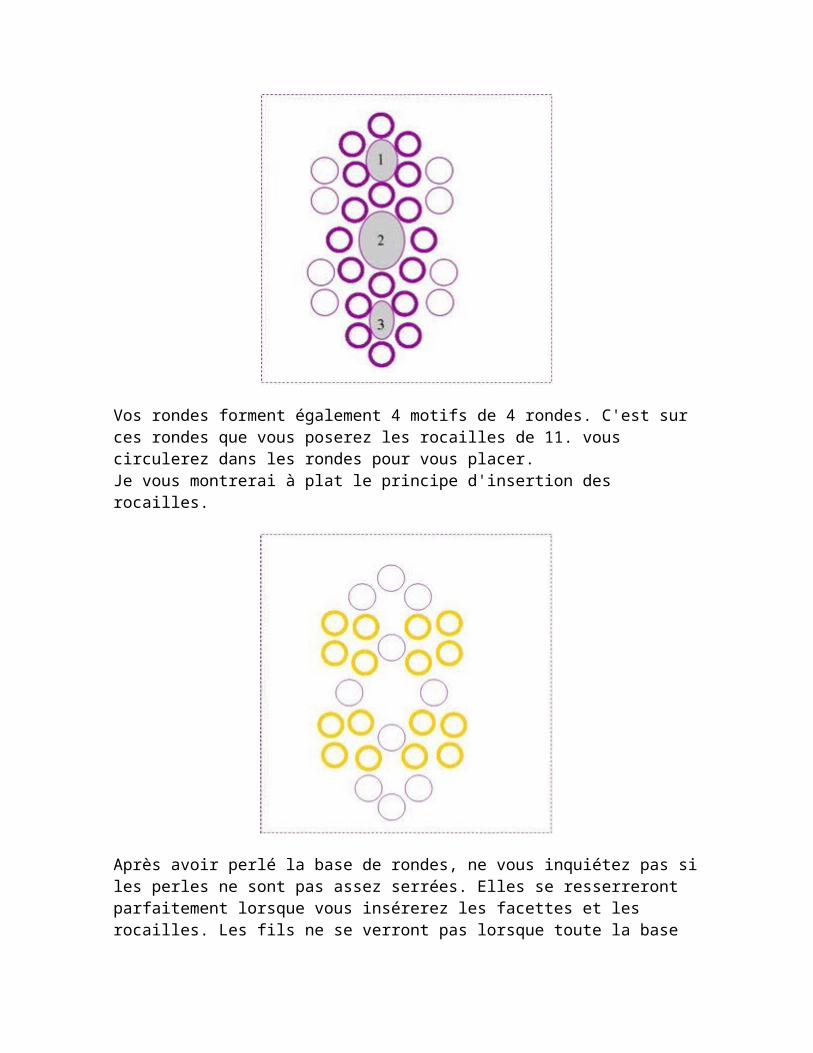
Après avoir perlé la base de rondes, ne vous inquiétez pas si les perles ne sont pas assez serrées. Elles se resserreront parfaitement lorsque vous insérerez les facettes et les rocailles. Les fils ne se verront pas lorsque toute la base sera reperlée. Pour poser facettes, rocailles, vous circulerez dans les rondes.
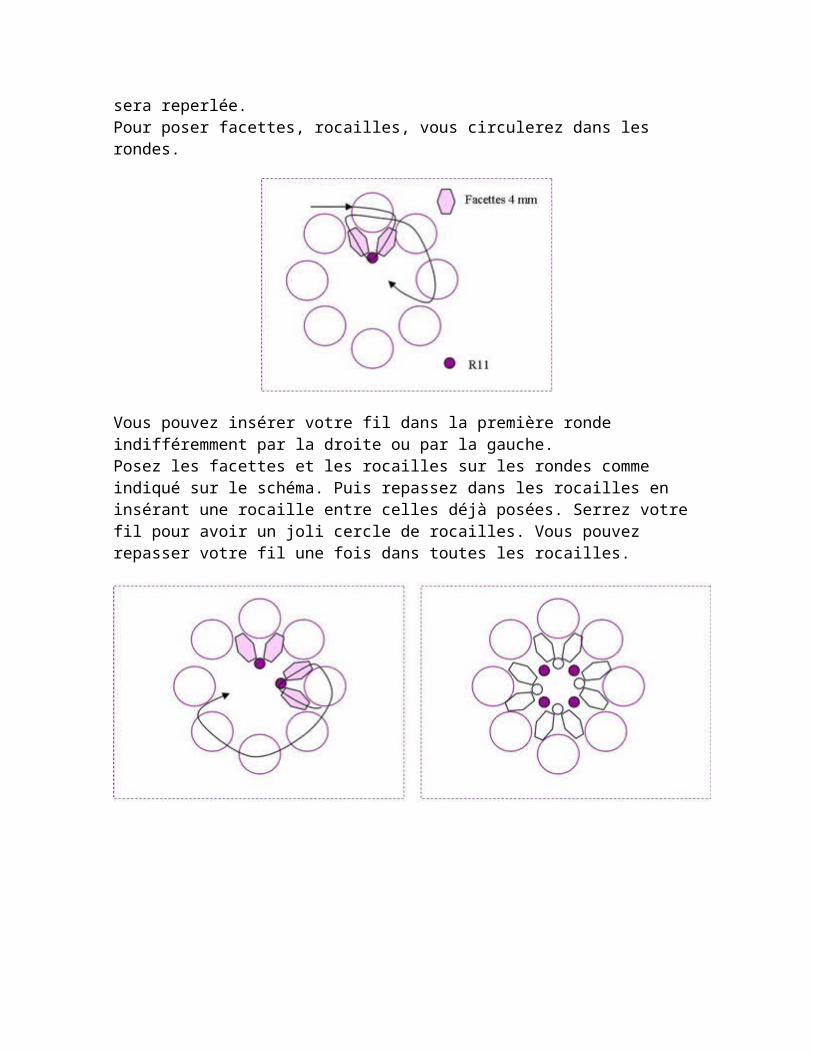
Vous pouvez insérer votre fil dans la première ronde indifféremment par la droite ou par la gauche. Posez les facettes et les rocailles sur les rondes comme indiqué sur le schéma. Puis repassez dans les rocailles en insérant une rocaille entre celles déjà posées. Serrez votre fil pour avoir un joli cercle de rocailles. Vous pouvez repasser votre fil une fois dans toutes les rocailles.
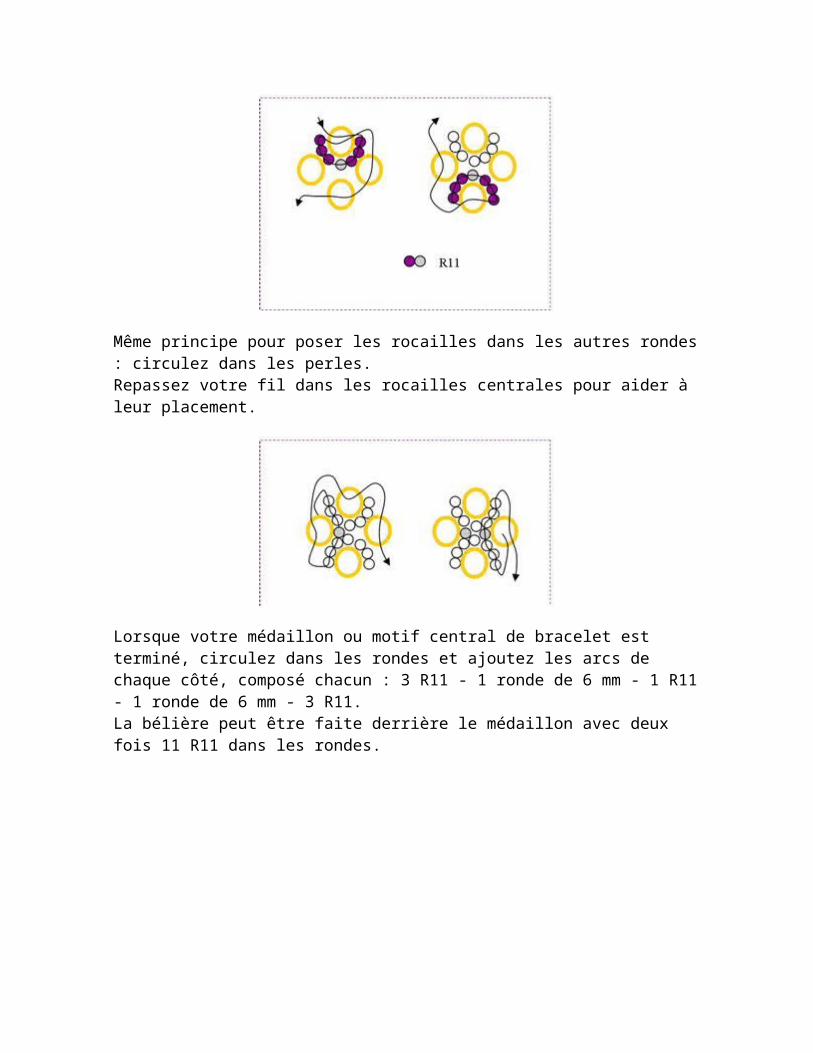
Même principe pour poser les rocailles dans les autres rondes : circulez dans les perles. Repassez votre fil dans les rocailles centrales pour aider à leur placement.
Lorsque votre médaillon ou motif central de bracelet est terminé, circulez dans les rondes et ajoutez les arcs de chaque côté, composé chacun : 3 R11 - 1 ronde de 6 mm - 1 R11 - 1 ronde de 6 mm - 3 R11. La bélière peut être faite derrière le médaillon avec deux fois 11 R11 dans les rondes.
Pour le bracelet, poursuivez individuellement votre perlage avec des motifs de 3 rondes tissées en raw, sur lesquelles vous poserez des rocailles comme dans le médaillon. Vous poserez ensuite les parties de votre fermoir lorsque la longueur de votre bracelet sera atteinte.